Please note that I am going to totally
revamp this pattern.
When I first made this teacosy I didn't keep
notes as I really didn't expect that anyone
would want to make it.
So I made a second cosy and wrote up general instructions.
Now that I look at it 4 years later I realize that it would
work better to start at the top and also
to give line by line detailed instructions.
With that said
if you haven't started it yet you might want to
wait for the newer version.
I will put the link to the newer version here
and eventually close this post down.
Thanks for understanding.
added....July 2012
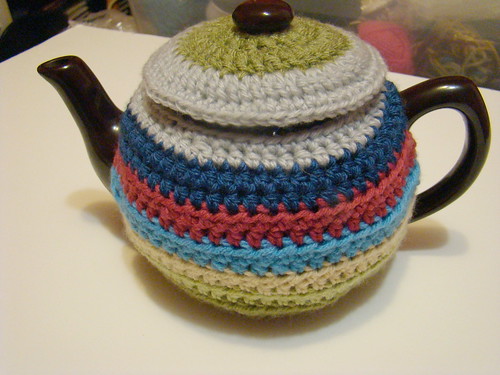
Back in February I made the top cosy and was asked
if I could post the pattern (my apologizes for taking so long).
I made a second one for a larger pot (above)
and diligently wrote down each row and each stitch count.
But because there are so many different shapes
and sizes of teapots
I thought it would be much more helpful if
I explained the steps involved
instead of giving you a list of numbers.
That way you can make a cosy that fits
your pot instead of mine.
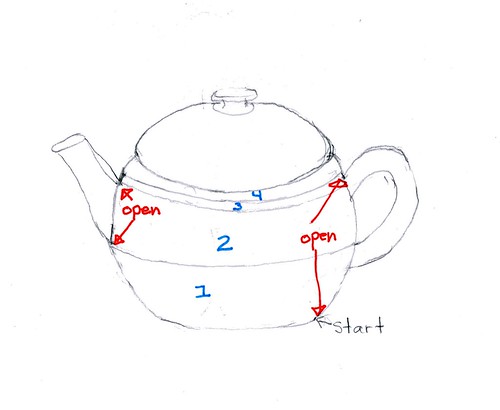
This cosy is made, starting at the bottom.
It's important to keep trying your cosy on
your pot as you work on it
so that you can make the necessary increases/decreases.
I flipped my teapot upside down on my lap
while I worked to make things easier for me.
At first, as you work the first few rows
the cosy will not want to stay on the pot.
I found that it helped to temporarily tie the opening
(under the handle) closed with some yarn.
As you get further into the cosy
it will stay on easier.
I untied it when I got nearer to the top
of the spout.
When you are finished the cosy
you will go back and add a buttoned closure
to this opening
so that it hugs the bottom of the pot snuggly
but still allows the cosy to
be easily slipped on and off the pot.
(If you prefer you can add extra chains in section one
so that the closure can be worked at that stage.)
Teacosy:
I worked my cosy in hdc but feel free to
experiment with other stitches.
I worked 2 rows of each colour for the body
and I ended rows with 2 chains for turning.
I do not tell you where to add the increases/decreases,
trust me.... your pot will let you know.
There are 4 sections to the body.
The size of each section will vary with different pots.
The cosy in the picture below is shown upside down so the hole you see at the top is actually the
bottom of the cosy.
This was the second cosy that I made. Note that in this picture I have used the second option
in the instructions where I have added a tab (it's temporarily pinned to form a closed circle.)
And here is a shot showing the opening for the spout.
The cosy is shown right side up.
Notice for this teapot that the opening for the spout starts really low.
Body:
1. Bottom section: This is worked in rows leaving an opening only for the handle.
The instructions don't include the tab under the handle, you can add that when the cosy
is finished. (Or you can add more chains and work the tab).
Make as many loose chains necessary to go from the the edge of the handle around the pot to the other edge of the handle. I found that my yarn stretched so I took that into consideration.
Add 2 more chains for turning.
Work rows of hdc turning at handle.
Your last row should just touch the bottom of the spout.
2. This section is worked leaving both the handle and the spout open.
You will now work 2 sides separately.
Each side will be worked in rows between the handle and the spout.
Work on one side first...making as many rows necessary to reach the height of
the top of the spout (on most teapots you will reach the top of the spout before the handle
....but not always).
When you are finished side one break yarn.
(If you finish on your first row of a colour then leave a longer tail (long enough to make a full row of hdc around the pot.
If you finished on your second of a colour then just leave the usual tail length.
You'll see why in section 3).
Join new yarn to second side and finish that side to same height as first. Break off yarn as usual.
3. This section is worked with an opening only for the handle.
You probably only have to work a couple of rows for this section.
Join new yarn to the first stitch on side one (handle side)...or use dropped yarn.
Work across side one to the spout, then make enough chains to go across the top of the spout, then join to second side ( I made a slip stitch in first st, ch 2 then put my first hdc into sl st)
Continue crocheting across second side turning at handle.
Continue working rows back and forth until you reach the height of the top of the handle.
4.This section is worked in rounds not rows.
Crochet across until you reach the handle top, make enough chains to go across the handle
then continue working in rounds
You should be making quite a few decreases in this part...
to give you an idea; I went from 68 st to 55 st over 5 rows.
I ended just under the ridge of the top opening. You might have to end with sc for the last row
if necessary.
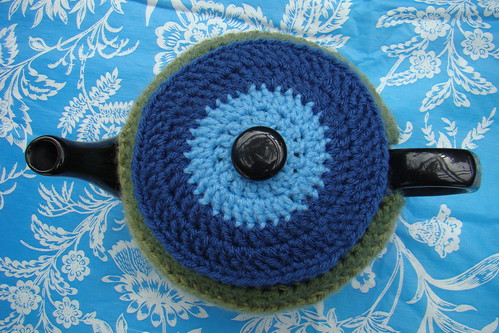
Lid:
This is basically a circle with a hole in the centre for the knob
I worked the entire lid in dc.
I chained 16 joining with sl st.
Remember that you are making a dome so you really are just making less increases
to the normal pattern of a flat circle.
Finishing up.
If you haven't added a tab for under the handle you should add it now.
I just attached the yarn to the bottom edge and chained enough stitches
so that I could form a small tab below the handle.
I made a space for the button by making a few slip stitches.
I also crocheted a row of slip stitches along the edges of the openings for the spout and handle
just to clean up the edges.
I used the loose tails of the rows instead of using a new piece of yarn so that it wasn't
edged in a single colour.
Please let me know if something confuses you
and I'll try to clarify it.
As usual I ask that you do not reproduce this pattern
or claim it as your own.
Please feel free to link to my page.