I have a 5 year old niece who lives in Texas which
is over 2000 km away from me.
So you can probably guess that I don't see her very often.
But the last time I did I discovered that she loves
making things so I promised that I'd crochet her something.
So I decided to combine a 6 inch embroidery hoop
with crocheted flowers.
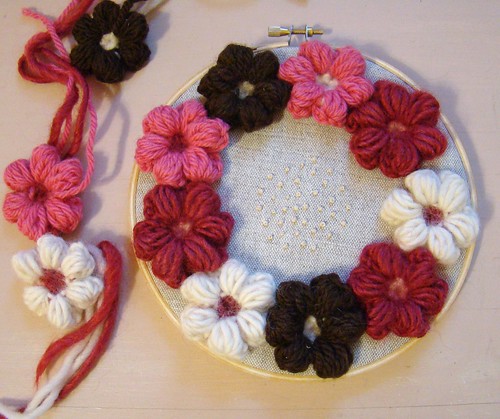
I thought that this would look nice
hanging on her wall.
The flowers themselves are from a wonderful
free pattern made by Brigitte Read
The embroidery stitches in the centre
are simple french knots...
not difficult even for a beginner.
are simple french knots...
not difficult even for a beginner.
The only problem I had was how to make
the back look presentable.
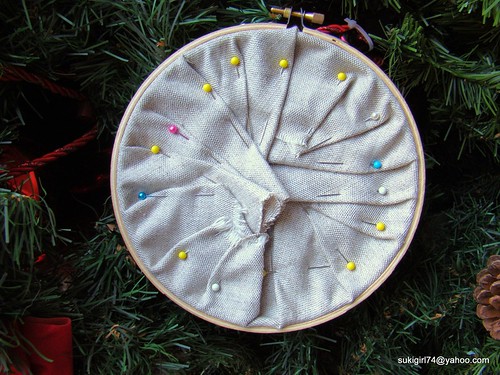
I tried pleating it with the idea of
sewing them in place but
the centre part looked frayed and messy.
So I searched Pinterest to see how others
have finished their hoops
and ended up using this one.
and ended up using this one.
hoop tutorial
I would suggest that you look over
her tutorial first to see what steps are involved.
She explains them in detail.
I would suggest that you look over
her tutorial first to see what steps are involved.
She explains them in detail.
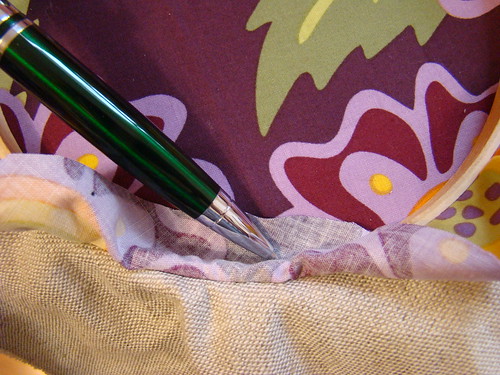
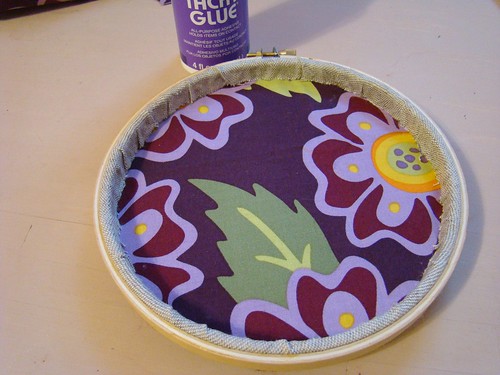
For my backing I picked a purple floral fabric.
I wanted to stick with a flower theme.
I wanted to stick with a flower theme.
First I put my embroidery piece
and my piece of fabric wrong sides together.
I inserted them into the embroidery hoop
making sure everything
was nice and tight.
As you can see in this pic of the back
I also trimmed the fabric material to about
3 inches just to make the next step easier.

Next I folded the fabric layer
over the hoop and using a pen I marked
where the fabric hit the base of the hoop.
Do this all the way around the hoop.
Then cut along this line.
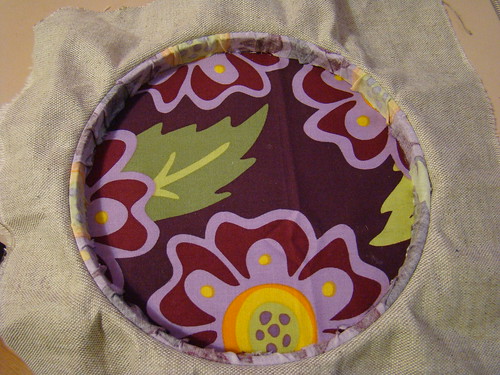
Next put glue (I used Aleene's fast grab tacky glue)
on the edges and inside wall of the hoop,
then carefully pressed the fabric onto the hoop.
I let it dry well for a couple of hours
before starting on the embroidery layer.
I repeated the same steps for the embroidery layer
Here is a pic of it ready to be cut.

And here is a pic of it cut and glued.
I did end up putting on a little extra glue
for this final layer.
Not exactly perfect but good enough
for a first time and for something that
will be against the wall.
Any thoughts?
and my piece of fabric wrong sides together.
I inserted them into the embroidery hoop
making sure everything
was nice and tight.
As you can see in this pic of the back
I also trimmed the fabric material to about
3 inches just to make the next step easier.
Next I folded the fabric layer
over the hoop and using a pen I marked
where the fabric hit the base of the hoop.
Do this all the way around the hoop.
Then cut along this line.
Next put glue (I used Aleene's fast grab tacky glue)
on the edges and inside wall of the hoop,
then carefully pressed the fabric onto the hoop.
I let it dry well for a couple of hours
before starting on the embroidery layer.
I repeated the same steps for the embroidery layer
Here is a pic of it ready to be cut.
And here is a pic of it cut and glued.
I did end up putting on a little extra glue
for this final layer.
Not exactly perfect but good enough
for a first time and for something that
will be against the wall.
Any thoughts?


No comments:
Post a Comment