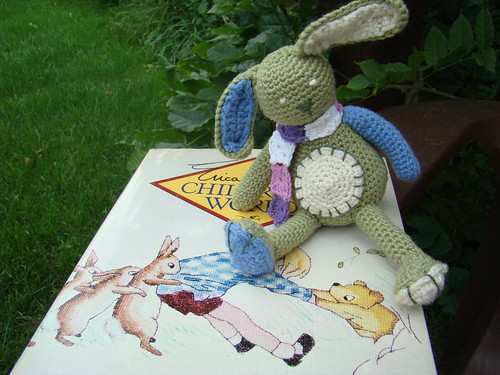
I've finally decided to write up my Hobbes pattern
and instead of selling it
I'd like to give it to you for free.

The reason he is free is because
the creator of Calvin and Hobbes,
Bill Watterson
did not want to commercialize his work
so keeping that in mind
Please don't sell this pattern
and don't sell the completed work.
I feel that part of enjoying Calvin and Hobbes
is also respecting the man who created it.
So this pattern is offered to people
who want to make Hobbes for themselves
or a loved one.
~~~~~~~~~~~~~~~~~~~~
I originally made this up for my son because
of his love for Hobbes (he's 23 now)
I armed myself with Watterson's brilliant
drawings as a reference.
I made this pattern to look as close
as possible to the Hobbes' drawings .
I realized that Hobbes could be
broken down into basic shapes.
His head is really just a fat cylinder,
his arms, legs and body are really
just cylinders with stripes on them.
He also had the muzzle of a cat
so I looked to
the famous Amineko cat.
And despite what it looks like
that muzzle is just an unstuffed, flattened
cylinder too.
Once I got the shapes down I worked on size.
I had to make sure that each part was
in the right proportion to each other.
It was actually quite fun and challenging
to create a 3D yarn toy
from a 2D drawing.
Until I started making him I never realized how different
Hobbes looks from a regular cat.
His head and body are a lot longer than
an normal cat plus
he has the shortest fattest legs.
That caused me problems since
tubular legs and arms don't want to bend.
And if he can't bend then he can't sit
which means he couldn't sit under
trees waiting for Calvin to bring him to life.
So I compromised a bit by not stuffing
the upper parts of his arms and legs.
Not exactly perfect but the best that I could do.
I hope you enjoy making him
and I'd love if you left comments!
If you do make him please let me know.
Also please credit me as designer and
include a link to this post
when you do post pictures.
Resources:
There are a lot of sites that have tutorials for making jogless stripes.
Pattern notes
You will need:
Hook size: 4.5mm
Worsted weight yarn in orange, black and white (less than a 100 g ball each).
Black felt for eyes, nose and 2 stripes
A small strand of embroidery
Darning needle
stuffing
All stripes (except 2 on top of head) are made by changing
colours in the pattern.
Please note that you will be working in the round.
Also note that
at the end of each round you will slip stitch to join and chain 1.
This will minimize jogless stripes (see above resources).
Head:
Using orange yarn
(1) 6 sc into magic loop, tighten loop (6 st)
(2) [2 sc in each stitch ] (12 st)
(3) [1sc into the 1st sc, 2 sc into the next sc] 6 times (18 st)
(4) [1sc into each of next 2 sc, 2 sc into the next sc] 6 times (24 st)
(5) [1sc into each of next 3 sc, 2 sc into the next sc] 6 times (30 st)
(6) [1sc into each of next 4 sc, 2 sc into the next sc] 6 times (36st)
(7) [1sc into each of next 5 sc, 2 sc into the next sc] 6 times (42 st)
(8) [1sc into each of next 6 sc, 2 sc into the next sc] 6 times (48st)
(9) Work even (48 st)
Now you start on the black stripes at the back of his head.
When you switch back and forth between black and orange you will have to fasten
off each colour. This will result in a lot of ends...I didn't weave them in since they
are tucked inside his cute head but that decision is up to you.
But don't worry...this is the only part of the pattern where this happens.
(10-11) make 16 sc in orange then 32 sc in black (48 st)
(12) work even in orange
(13-15) Same as rows (10-12)
(16-17) make 16 sc in orange then 32 sc in black (48 st)
The rest of the head is worked in orange only.
(18-21) work even (48 st)
(22) [1sc into each of next 6 sc, 2sc decrease] 6 times (42st)
(23) [1sc into each of next 5 sc, 2sc decrease] 6 times (36 st)
(24) Work even
(25) [1sc into each of next 4 sc, 2sc decrease] 6 times (30st)
(26) Work even
(27) [1sc into each of next 3 sc, 2sc decrease] 6 times (24 st)
(28-30) Work even, fasten off leaving long yarn to sew head on.
Stuff head
Muzzle: Do not stuff!
In white
(1) 6 sc into magic loop, tighten loop (6 st)
(2) [2 sc in each stitch ] (12 st)
(3) [1sc into the 1st sc, 2 sc into the next sc] 6 times (18 st)
(4) [ 2 sc in first st, 1 sc in next 5 stiches] 3 times (21 st)
(5-18) work even
(19) [2sc decrease , 1 sc in next 5 st] 3 times (18st)
(20) [1 sc in next st, 2sc decrease] (12 st)
(21) decrease in every stitch (6st)
(22) decrease in every stitch (3 st).
If you rather you can skip this last row and sew the hole up with yarn instead.
Fasten off leaving enough yarn to sew muzzle to head.
Ears (Make two)
These are just 2 triangles
In black
(1) 4sc into magic loop (4 st)
(2) increase in every st (8 st)
(3) [1sc into each of next 3sc, 2sc into the next sc] (10 st)
(4) [1sc into each of next 4sc, 2sc into the next sc] (12 st)
(5) [1sc into each of next 5sc, 2sc into the next sc] (14 st)
(6) work even
Fasten off and leave enough yarn to sew to head.
Hand press them to look like ears
Putting the details on.
The eyes, nose and stripes on the top of his head are all made of felt.
Use the picture for placement...pin everything on first so you can make
sure that it all looks good. Take your time with this part.
This is the most important part of the whole pattern...it's what makes
your stuffed toy become Hobbes.
I take a picture of it ...that helps me a lot.
All the felt pieces are hand sewn on with thread, the muzzle is sew on with yarn.
Sew the nose onto the muzzle and add a couple of embroidery lines below the nose,
Put some stuffing behind the muzzle piece and sew onto head.
Sew the eyes on about the same level as the bottom stripe.
Sew on ears and 2 stripes using picture as help.
Body:
Starting from bottom up.
In orange
(1) 6 sc into magic loop, tighten loop (6 st)
(2) [2 sc in each stitch ] (12 st)
(3) [1sc into the next first sc, 2 sc into the next sc] 6 times (18 st)
(4) [1sc into each of next 2 sc, 2 sc into the next sc] 6 times (24 st)
(5) [1sc into each of next 3 sc, 2 sc into the next sc] 6 times (30 st)
(6) [1sc into each of next 4 sc, 2 sc into the next sc] 6 times (36st)
(7) [1sc into each of next 5 sc, 2 sc into the next sc] 6 times (42 st)
(8) work even
(9-10) using black work even
(11-12) using orange work even
Continue working rows 9-12 until you have a total of 6 stripes of each colour.
(33) in black [1 sc in next 5 st, 2sc decrease] 6 times (36 st)
(34) work even
(35) in orange work even
(36) [1 sc in each of next 4 st, 2sc decrease] 6 times (30 st)
(37-38) in black work even
(39)
In orange [1 sc in each of next 3 st, 2sc decrease] 6 times (24 st)
Fasten off
Legs (Make 2)
In white
(1) 6 sc into magic loop, tighten loop (6 st)
(2) [2 sc in each stitch ] (12 st)
(3) [1sc into the next first sc, 2sc into the next sc] 6 times (18 st)
(4) [1sc into each of next 2sc, 2sc into the next sc] 6 times (24 st)
(5-9) work even
(10-11) in black work even
(12-13) in orange work even
Repeat rows 10-13 until you have 4 stripes of each colour
Fasten off leaving enough orange yarn to attach to body.
Arms Make 2
Work the same as the legs but skip row 9.
Also at the end, do another row of 10 and 11 of black.
Fasten off and leave enough black yarn to sew arms onto body.
Tail:
starting from the tip of the tail
In black
(1) 6 sc into magic loop, tighten loop (6 st)
(2) [2 sc in each stitch ] (12 st)
(3) [1sc into each of next 5 sc, 2 sc into the next sc] 2 times (14 st)
(4-5) work even in orange
(6-7) work even in black
Repeat Rows 4-7 until you have 13 orange stripes and 13 black stripes
Then add another stripe of orange (rows 4-5)
Fasten off and leave enough orange yarn to sew to body.
Belly Band (oval)
Don't get scared off this section
His tummy patch is simply an oval.
If you know how to make one then just skip this section totally.
In reality ovals are very simple...(it's the written instructions that make them seem complicated
to make especially as you add new rounds.)
All the increases in an oval are at the ends.
The straight sides have no increases.
I'll give you written instructions for the first round since it is easy,
then I'll show you visually where the increases go for the next rounds
Ch 16 in white
Round 1:
Remember to mark your first stitch with marker
Starting in 2nd chain from hook sc 14, 3sc in last st.
Rotate work around and start working on other side of chain.
Sc 13, make 2sc in last st.
Now look at this drawing:
I've drawn out 4 ovals that represent the four rounds
The red arrows represent where the increases occur.
You should note 2 things
1-The number of increases stay the same during each round
(3 extra increases at each end for a total of 6 increases)
2- There is one increase that always stays in the same place and the other two take
'steps' away from this centre increase. It's like they are getting mad at the bossman
and the longer they are with him the further they want to be from him.
In Round 1 all three increases were in the same stitch. (at each end)
They were friends.
Now for the rest of the rounds
Round 2:
Notice that the two side increases have moved away from the centre increase.
They now are 2 stitches down from it (separated by a sc)
So what you are going to do is first mark the centre stitch at both ends.
Just do it by eye.
Now count down 2 stitches on both sides and that is where your side increases will go.
Do that also for the other end.
Now crochet that row putting increases only in those places. (6 in total)
Every other stitch will be worked evenly..don't forget to put a sc in between those increases.
Round 3: Again mark your two centre stitches...count down 3 stitches on both side...that is where your increases go.
Every other place gets a sc.
Round 4; Mark your two centre stitches...count down 4 stitches on both side...that is where your increases go. Every other place gets a sc
For me 4 rounds fit Hobbes nicely but if you want it larger just
continue moving those side increases down a stitch for each round.
Putting the body together
Stuff the body and sew on the belly band.
Stuff the arms and legs but only stuff the joint area lightly as
you want to make him bendable.
Use yarn to sew on the appendages.
Sew head onto body adding stuffing if needed.
Pick him up, give him a hug!