Friday, December 18, 2009

Another crocheted Max from the Wild Things

Another Max finished

What is really cool about Max is that
he makes a great gift for both
a 25 year old male (my son) and 
a one year old girl (my niece).

Again this is from this great pattern.
by Allison Hoffman from
 Crafty is Cool (etsy).

I loved making him,
so easy, and so well designed.
I can see myself making this pattern again.

Related link: A Tale of Two Maxes

Sunday, December 13, 2009

Hobbes.... waiting to come alive

You can now find my free pattern here.

I've been waiting for a nice sunny day
to take a picture of my finished Hobbes
and today was the day.
How do you like him?

Finished Hobbes

I decided to make the Hobbes that
the world sees, not the one Calvin sees.

I wanted to remain as true to the original
drawing as I possibly could.


I'm pretty sure by son will 
be happy with his Hobbes.

Thursday, December 10, 2009

A Tale of Two Max's

A tale of two Max's


I made the bag on the left to hold
the crocheted presents that I made
for my darling new sweet niece.
You could also use it as a Xmas stocking.
I really love how it came out despite the fact
that my sewing machine had major problems
and that I could only find the acrylic felt
and not the nice wool felt.
This great free pattern comes from
the totally cool blog Meet Me at Mikes.


I crocheted the little Max figure from
I found him easy to make and
only changed his nose.
His crown comes off and his
hood comes down, how cute is that!
I'm part way finished making a second
one for my son.

Related link: Another crocheted Max

Tuesday, November 3, 2009

The beginning of Hobbes


Hobbes
Originally uploaded by sukigirl74

Since we are now in November I thought
it was high time that I get started
on my son's Xmas present.

Saturday, October 24, 2009

We interrupt this program for a short announcement


knitted breast
Originally uploaded by acechick

As you probably already know
October is Breast Cancer Awareness month.

This year it was a little more personal to me
as my annual ultrasound showed a
small lump...
thankfully my results turned
out to be negative.

So a small reminder.
Take the time to perform
breast self-examinations.
Check with your doctor whether
you should be getting a
mammogram and/or ultrasound.


Friday, October 23, 2009

Tasty Crochet


Tasty Crochet
Originally uploaded by sukigirl74


I've been working on a batch of crocheted
food for my 2 nieces.

These are some of the snacks I've made so far.
The patterns are easy to make and
are from
the great book called
Tasty Crochet by Rose Langlitz
.

Wednesday, October 21, 2009

How I came to love tea and their cosies


You can never have enough cosies
Originally uploaded by sukigirl74

I was first introduced to tea time
and all it's grand traditions
through the English side of my family.
Every summer our family and
my aunt's family would visit my
Great Aunt for two weeks at her
place by the beach.
Twice a day we were summoned
to tea time by the ringing
of an outside bell.

The grownups including my grandmother
would carry the trays of teapots,
teacups and slices of cake.
We children would carry the
trays of cheese and crackers
and pop since we weren't
old enough for tea.

During the rest of the year
we often didn't get to see our relatives
because we were scattered across the country
so these times were very special to us.

The teapots at these gatherings were
covered in knitted, well worn cosies.
They looked like hats that
our mothers
had popped on them,
and unlike us, they accepted
their adornments without struggling.

Years later I visited England,
and saw all the beautiful cosies there...
it brought me back to those wonderful days.
I bought my first teacosy (made of cloth)
and since then have made a point
to indulge in teatime at least once a day.


Related post: My first knitted cosy


Tuesday, October 20, 2009

Great Malabrigo Giveaway

Salihan Crafts is having another great giveaway!
This time it is for 2 skeins of lovely Malabrigo yarn,
how nice is that!
All you have to do is pick out which
Malabrigo yarn you'd like to win
and then leave a comment on her post
Yarn & Kisses Malabrigo Giveaway
Last day to enter is October 25.

And while you are there check out the
rest of Salihan crafts.
It is filled with lots of yarn, diy, recipes
and other goodies.

Monday, October 19, 2009

Have you seen a teacosy like this before?


DSC02291
Originally uploaded by sukigirl74

Isn't this a beautiful tea cosy!
I really wish that I could take credit
for making it .
I bought it at a small garage sale put on
by a group of lovely older Polish women.
I'd be curious to know how old
it is and if there is a pattern for it
floating out there somewhere.

It is crocheted with loops pulled through
and as you can see,
is made with the most glorious colours!
The flowers are simply made
from loops of yarn tied in the middle
and are laid on a bed of pale green yarn.

If you've seen one like this
I'd love to hear about it.

Sunday, October 18, 2009

A Knitted Cosy fit for a teapot

Although this isn't a great picture I
thought I'd post my finished cosy.

My knitted teacosy

I feel fairly happy about it,
I didn't drop any stitches,
it didn't end up half finished
stuck in a drawer somewhere
and it fits my teapot.
Not too shabby.

At first I did make it way too tall
so I managed to rip back a few rows
and make it shorter.

I used 4mm circs and one
skein of Noro Kureyon 163
and this lovely free
pattern by aemmeleia

.
I actually made this for my
sister for Xmas but it may
be too dark for her.
Also, the last time she visited
I asked her if she wanted tea and
she said "oh good god no!"

Wednesday, October 7, 2009

Today's Problem & Solution...knitting

My problem:
I want to try knitting
a teacosy and the pattern
calls for 5mm small circular needles.
I am a beginner knitter.. I don't have any.

Solution:
When I checked my free needles
(given to me by my sweet mum)
I only found some really large
circular needles in that size.

So I went to my favourite
knitting help site
(aptly named knittinghelp)
and found a video demonstrating
a technique which allows you to
do small diameter circular knitting
on larger diameter needles.
Magic Loop Knitting

Tuesday, September 29, 2009

A sad goodby


Comet
Today I said goodbye to the sweetest,
and
gentlest dog that I have ever known
and it broke my heart.

Monday, September 14, 2009

Crochet Apple Cosies

No... these apples aren't wearing
sweaters to keep them warm.
These cosies actually have a practical
purpose...keeping them from getting bruised.

I'll be curious to see if they work ...
don't they look pretty!

Link to free apple cosy pattern.
Link to leaf pattern


Tuesday, August 25, 2009

A vintage style crochet bunny

For a long time I've had an image of a bunny
in my head that I've wanted to make .
It has floppy ears, arms and legs,
so that a little girl could easily grab it
and carry it around.

I came across a pattern very close to it,
this is the result.


It's not exactly the same as the bunny
in my head but he's pretty close.
When I completely finished him I
couldn't figure out why I wasn't happy with him.

That's when I realized the reason.
It was because my imaginary
bunny was a girl and although I
tried, there was no way this guy
wanted to be transformed into a girl.
He did, however, keep his wee granny
square scarf in pink and purple.

Maybe someday I'll make
a female version but for now
he'll do.
The pattern came from a book
called Vintage Crochet by
Susan Cropper.
The errata, which includes
the entire pattern
is here
.

Wednesday, August 19, 2009

Peter Rabbit embroidery

I was cleaning out the crawl space in
my laundry room today and found this.


In 1977 ( pre-children, pre-husband),
when I had loads of time,
I decided to try embroidery for the first time.
Being young, I decided to tackle a fairly large project
so I bought a this crib sized Peter Rabbit cover.


My stitches aren't too bad for a beginner
but
I only managed to embroider this one panel
but I did finish all the words
in the other panels
Then I quit.

Here is an overall picture of what

it could look like.

I still have all the embroidery thread
and the instructions
so I'm going to
set this aside for a winter project.


I have no idea how far I'll get but
hope springs eternal.

Tuesday, July 14, 2009

Free knit and Crochet patterns

I'm the administrator for a great group
over on Flickr called
FREE KNIT AND CROCHET PATTERNS
where members
post their projects along with the
links to the free patterns.

It's a great resource.
Right now we have over 2500
of some of the coolest projects.
Some are perfect when you want
a little instant gratification.
Others take longer, but the results
are so beautiful
that it is well worth it.

Check it out...grab some patterns,
and make something!

Sunday, July 5, 2009

Comparing crocheted and knitted baby booties

I've never made the same project before
in both a knitted and crocheted version.

But these booties came in both
so it was interesting to compare them.


This isn't a totally fair comparison
because
the knitted did get an unfair advantage by
getting the better yarn and
the smaller size.
I''ll take that into consideration.


Crocheted version
Baby boy booties for Sebastian
Knitted version
Saartje's booties

Looks:
I think if they were both made with identical yarn
and identical sizes
then they would be EQUAL in cuteness.
The knitted version was made with
some lovely soft wool in a smaller size
while the crocheted one was a test run made
with acrylic in a larger size.

Seams:
The crocheted version gets big points for no seam
up the back. It looks better and is much faster to make.
I think this is the biggest difference between these two patterns.

Price:
The big advantage for the knitted version
is that

the knitted version was free while
the crochet version cost $5.95 (US)

Fit:
The knitted one stretched more because
of the stocking st.

This could be seen as a plus or minus depending
how closely the fit matches the baby's feet.
This was an advantage for me because it turns out that
the baby had bigger than average feet.
Not sure if there is a downside to this stretchiness.
So the winner?
Both have advantages and disadvantages so
it really comes down to personal choice.
For me, it's the crochet version because
I can't knit that well and I'm willing to pay
for the advantage of seamless.

Wednesday, June 17, 2009

Would you pay $182.14 US for this USED softcover book?


That is what someone
on ebay is asking.
On Amazon, someone has it listed at $156
and a while back I saw it for $220....all used.
I'm sorry but that's just nuts.

I have only seen one project made from this book
a cute, retro style, crochet owl cosy.
So I was always left with the impression
that this book must be full of amazing little projects.
Well I discovered this is NOT the case.

A couple of days ago I found a copy
at my local bookstore for $4.99.
You can imagine how thrilled I was....
until I opened the book.
There are only a couple of cute tea cosies
the owl and the one on the cover.
The rest are either boring or just plain ugly.
Honestly, I think $4.99 is about the
right price for this book.


Don't get me wrong, I LOVE tea cosies, so I it kills me
to diss one of the few cosy books out there.
But there are 2 books that I would recommend,
both have gotten good feedback and are priced right.
This first is called Wild Tea Cosies
and the second, which I have,
is simply called Tea Cosies.

Also, here are a couple of sites that
you might enjoy.
Check out Handmadelife
for her version of the owl cosy from the Killer book
and Wild For Tea Cosies
which is a wonderful site penned by
Loani Prior,
the author of Wild Tea Cosies .
Here you will find pictures of some beautiful cosies ,
some from her book and some from other sources.
And last but not least Ravelry has a great
group called Cuppa Tea.
Check out their completed cosies and also their
great forum!

Monday, June 15, 2009

How to crochet Eve from Wall-e

I wanted to see if I could come up with
a pattern for Eve.
She is actually quite simple to make;
she basically has an egg-shaped body and
a squished sphere for a head.
This is what I came up with,
she is 4 1/2 inches small.

Crochet Wall-e


Pattern

-White worsted weight yarn and 4.mm hook
-blue embroidery floss plus needle
-black felt
-polyfil for stuffing
I worked her in spirals and marked the beginning of each row with a marker.

Head:
Work 6 sc into magic ring. (6)
Round 1: 2 sc in each stitch (12)
Round 2: *2 sc in first st, sc in next st* repeat (18)
Round 3: *
2 sc in first st, sc in next 2*repeat (24)
Round 4: *2 sc in first st, sc in next 3* repeat (30)
Round 5:
*2 sc in first st, sc in next 4* repeat (36)
Round 6: sc in each stitch (36)
Round 7: * sc dec in first, sc in next 4* repeat (30)
Round 8:
* sc dec in first, sc in next 3* repeat (24)
Round 9: * sc dec in first, sc in next 2* repeat (18)
Round 10:
* sc dec in first, sc in next * repeat (12)
Fasten off leaving a long tail.
Stuff firmly with polyfil

Body:
Work 6 sc into magic ring. (6)
Round 1: 2 sc in each stitch (12)
Round 2: *2 sc in first st, sc in next st* repeat (18)
Round 3: *
2 sc in first st, sc in next 2*repeat (24)
Round 4: *2 sc in first st, sc in next 3* repeat (30)
Rounds 5-10: sc in each stitch (30)
Round 11: * sc dec in first, sc in next 3* repeat (24)
Round 12: * sc dec in first, sc in next 2* repeat (18)
Round 13: sc in each stitch (18)
Stuff firmly with polyfil
Round 14:
* sc dec in first, sc in next * repeat (12)
Round 15: sc in each stitch (12)
Round 16: sc dec in each stitch (6)
Fasten off and weave in ends.

Arms: Make 2
Again you are working in rounds.
-Try not to work your stitches too tightly especially at the beginning
since you are only working into a small ring of stitches.
It will get easier as you go.
-Make sure you use a marker to mark your first stitch (moving it each row).
- Check your stitch count after EACH row (shown in brackets).

Work 3 sc into magic ring. (3 st)
Round 1: 2 sc in first st, sc in next, 2 sc in last st (5 st)
Round 2: sc in first, * 2 sc in next, sc in next * repeat from*to* twice (7 st)
Round 3: 2 sc in first, sc in next 5, 2 sc in last. (9 st)
Rounds 4-7: sc in each (9 st)
Round 8: sc dec in first stitch, sc in next 2, sc dec in next, sc in last 3 (7 st)
Fasten off and leave a long tail. Stuff lightly to form an arm shape.

Assembly:
Using picture as a guide cut out a faceplate in the black felt.
If your felt is thin then cut two faceplates and sew them together using a blanket stitch.
Embroider eyes using blue floss: I used a backstitch to outline and then satin stitch to fill in.

Using black thread
sew on faceplate to head.
Sew head onto body then arms onto body.
If you find her arms stick out from her body too much
put a couple of stitches a bit lower from her shoulder into her body.
I attached fishing line to hang her because I didn't want to change her shape
just to make her stand.


Please note that all content and images are mine and are protected by
copyright.

I love to share my patterns but, as usual, please do not claim them as your own or publish my patterns in any way ....you are more than welcome to link to it. Do not sell any items made from this pattern. Also I ask that you credit me as the designer when posting your pics of any items you make.

Wednesday, June 10, 2009

Fulfilling a plege

Yesterday my sister came over for a visit
and I took the opportunity to teach her how to crochet
as part of a pledge that I made
here.
It was a short visit so I figured it would be best to keep
it simple and show her just the basics.
She caught on quickly, so I promised her another
lesson when we get together next
(she lives in another city).


It was a lovely way to spend the afternoon
and I'll update with pictures when I
get them from her.
Thanks Knitluck
for starting this great pledge!!

Friday, June 5, 2009

a boy with a dinosaur suit (times 2)


I have the cutest neighbours.
Finn is 2 years old and his brother Leif is 4 years old

They often stick their heads out their window and have a little chat with me.

Today for example I learned from his brother that 2 year old Finn was in trouble because he had started saying the F word and the X word (I don't know the X one but since they are Finnish maybe it is something that they picked up from their dad.)
I stopped myself from laughing... it was hard to picture the F word coming out of that sweet child's mouth.

They both love dinosaurs and Halloween and I've been wanting to crochet them something for a while. I finally saw this wonderful pattern by Owlish and knew that it would be perfect.

Two brothers in dinosaur suits

I made 2 'brothers', one slightly smaller, both with their initials on the bottom of their feet so that they don't mix them up.
I gave it to them today and was rewarded with big smiles.
I probably should have waited until Finn wasn't being punished but that is the advantage of being a neighbour and not a mother to them.

Thursday, June 4, 2009

7 random things

I have been tagged by coltpixy
to write 7 random things about myself.

1. I eavesdrop on people all the time, mostly at out-of-the-way coffee shops. I think I would make a good spy.

2. I never have less than 30 library books checked out and 40 on hold. The ones I have out now are a mix of yarn, mythology and art.
I love being cheap!

3. I like people who are slightly out of step with the mainstream.
Trust me, there are a lot of eccentrics in a city of 2 1/2 million.

4. I'd much rather have something used than new. I love that it has a history to it.
(Again this works into my cheapness factor).

5. I have started writing children stories just for the pure pleasure of it.
I do it just for me and I love the freedom and joy that comes out of this process.


6. I think I have entered my second childhood, how else can I explain this trend toward crocheting amigurumi toys.

7. I'm always trying to learn how to read lips.
It's actually very difficult to do, I thought it would be easier since I took linguistics in university but it's not. Sometimes I'll try to figure it out from watching tv and once I got so involved that I tried to read the Muppets' lips.......duh.


Tag you're it...but only if you want to play!

Howie Woo
salihan crafts
Mette
Nena


Tuesday, May 26, 2009

How to make wee crochet clothes

I hope you have fun making these clothes.
Little crochet clothes


All of the patterns are made in the round and are
unjoined (worked in spirals).
Let me know if you have any problems with the instructions
as they have not been tested.
Please let me know if you make any.
If you want to make the bag click here.

Clothespeg bag

The dress on the right is made in worsted weight
and the one on the left is made with sock yarn.
The skirt and the top are about 1 inch tall,
the pants and sundresses are all 2 1/2 inches tall.


Dress pattern:
Worsted weight and size 5.5 mm hook.
Work in rounds and use a marker to keep track of rounds
I made this in 2 sections, top and skirt.
This makes it is easy to also crochet the tops and bottoms as separate pieces.

Top part: (starting at waist)
Ch 13, sl st to form a ring.
Rounds 1 to 3: sc each round.
Bind off.
Make 2 straps by ch 7 and attach them to the top

(by sewing or sl st)
.
Or you can not bind off and sl st to the point where you want the straps and then work them directly on the top. Whatever works best for you.

Skirt part:
Flip top upside down and attach yarn with sl st to the waist.
Rounds 1 to 2: Sc each round
Rounds 3 to 5: Sc around but increase 1 st on each 'side' of skirt to cause it to flair.
(I put a safety pin on each side and when I got to it I worked 2 sc into a st.)
Bind off.

-------------------------------
Red skirt with grey edging:The main skirt is worked in a DK weight (Zara)
and the grey edging is closer to a sock weight. I used a 4.mm hook)

Using red yarn Ch 19, sl st to form ring,
Rounds 1 to 3: sc each round
Rounds 4 to 8: sc each round but increase 1 st at each side to cause it to flair.
Bind off.
Edging: Attach grey yarn to skirt hem with a sl st.
Work pattern [skip next st, 5 hdc in next st, skip next st, sl st in next]
working the last sl st into first st. Bind off.

-----------------------------------------------------------------
Skirt pattern: (not pictured)
( worsted weight)
Ch13, sl st to form a ring.
Work rounds 1 to 5 of dress pattern (skirt part).
----------------------------------------------------------------

Pants pattern
(I used sock weight yarn and size 4.mm hook)

Starting at waist:
Ch 18, sl st to form ring
Rounds 1 to 5: sc each round.Round 6: First pant leg...this is completely worked first, then you will reattach the yarn to make the second leg.
Sc in the next 8 st, then work next sc into the first sc of this round to form a ring.
Leave the other 8 stitches unworked for now.
Rounds 7 and up:Continue working in rounds until you reach the length that you want. For the last 2 rounds I increased a stitch on each side so that it would flair out like bell bottoms.
Bind off
Reattach for second pantleg and work the same as first.

---------------------------------------------------------------
I also made a second
dress using sock yarn with a hook size of 4.mm
I used the same pattern but added extra rows. Sorry I didn't keep track of the number, I just added extra until it looked right using the dress made out of worsted as a guide.
-------------------------------------------------
Grey top:
I used Marci Senders' great pattern and adjusted
the template so that the sides would flair.
--------------------------------------------
Working in ends:
You don't need to take much time with the ends, I quickly secured the ends on the inside and cut them to a short length so they wouldn't be seen.


Please note that all content and images are mine and are protected by
copyright.
I love to share my patterns but, as usual, please do not claim them as your own or publish my patterns on your site without my permission ....you are more than welcome to link to it. Do not sell any items made from this pattern. Also I ask that you credit me as the designer when posting your pics of any items you make.

Monday, May 25, 2009

How to make a crochet clothespin/peg bag

I use my outdoor clothesline a lot and when my store bought peg bag finally fell apart I decided to crochet one.
It seemed natural to make little clothes for the front of it so I ended up designing some that are very close to what I wore when I was around 20 years old.
Clothespeg bag

Today I'm posting the pattern for the bag.
You can find the free patterns for the clothes here.


Bag:
Yarn: Bernat cottontots, colour sweet cream.
Hook:4.5mm

Finished dimensions 12x20 (w x h)
Beginner level
You will make a large rectangle( with an opening) which you will later fold in half.
The width of the rectangle is the width of your hanger plus 1 inch and

the length is 2 times the height you want your bag to be.
I made my rectangle 12 inches by 20 inches.
I placed my opening 16 inches from the bottom of my rectangle.


For my yarn and hook size:
Make 53 chains.

Rows 1 & up
: sc each row to end, ch 1 turn. (52 st)
Continue crocheting rows until you have made a length of 16 in.


You will then make a row that has an opening for the pegs as follows:
Sc in the next 15 st, make 22 chains, skip the next 22 st, sc in the last 15 st.(52 st)
(Basically you want to divide your width into 3 parts ...2 sides and an opening.
First decide how wide you want your opening ..this will be the # of chains that you make and # of skipped stitches. The remaining # of stitches will be your two sides.)
Continue again with single crocheting each row for another 4 inches, Cast off.


Lining: You don't have to line it but I wanted to stop my bag from getting stretched out too much. I took the easy path and simply cut a piece of fabric that was 11 inches wide by 16 inches tall. Pin along outer edges and sew all edges using the same colour of thread as the bag itself.


Now is the time to sew on any embellishments.
I simply used thread to sew mine on.


Next fold the bag lengthwise and either sc or slip stitch the side seams closed.
Next insert the hanger through the top opening and crochet that closed leaving the hook part sticking out.
Add your clothes pegs and you're good to go!

Please note that all content and images are mine and are protected by
copyright.
I love to share my patterns but, as usual, please do not claim them as your own or publish my patterns on your site without my permission ....you are more than welcome to link to it. Do not sell any items made from this pattern. Also I ask that you credit me as the designer when posting your pics of any items you make.

Sunday, May 17, 2009

Little crochet clothes


These little crochet clothes will be part of a larger project.
I really enjoyed making up the patterns for these and when I get them typed up I will post them as free patterns.

How little are they?
The skirt is 1 inch, the pants and sundresses are all 2 1/2 inches.
I may play more with the patterns and I have some other ideas in my head that I want to try.

Saturday, May 2, 2009

A Bunny rattle made in crochet


This pattern by Vickie Howell came from the magazine
Crochet Today (Special Baby Issue May/June 09)

Since the body itself was so easy to crochet,
it left me time to have fun with the embellishments.

The bunny's head contains a rattle and I
added leaves and a flower for a little colour.

I also used the same yarn to embroider
the bunny's face.

I used fine merino superwash for the body.
wool/nylon sock yarn for the leaves,
and the leftovers from a lovely scarf
for the flower.

Friday, May 1, 2009

A wee pair of booties


I've had these made for a while but I could never
get a good picture.
Well the sun came out today
along with a few spring flowers
so here they are.

These are the famous Saartje's booties
(click link for the free pattern).
I didn't put buttons on mine, instead I crocheted
little leaves and sewed the straps down.
I knit the larger size but they are
still only 3 inches in length and I'm really
hoping that they fit my niece's baby girl.
I chose green because it is my niece's
favourite colour and also at the time
she was still pregnant and didn't know
the sex of the baby.

I used a sock yarn called Sisu which is
80% wool and 20% nylon.
I picked it because I love these greens
and also because it was really
reasonably priced.


Like others I didn't like all the ends
that had to be woven in
and I think there must be a million
different interpretations of how to
make the straps, but the end result
was well worth it.

Saturday, April 18, 2009

Calvin & Hobbes Bento box

I found this amazing Bento box when I was looking for images of the cartoon strip.
Bento #33: Calvin & Hobbes Bento!
Originally uploaded by AnnaTheRed

Yesterday my youngest son (21 yrs) was talking to me about Calvin and Hobbes. I had forgotten how much he loved them when he was younger, he reread each collection countless times over and over again. For years his room was decorated with a huge mural that I painted of Hobbes in pursuit of a grinning Calvin. The mural remained there for years until my son changed bedrooms and it became my workroom (I wish I hadn't painted over it).

So yesterday my son asked me if I could make him Hobbes.
This made me happy for a lot of reasons. First.... he still remembered how much joy this mischievous boy and his tiger had brought to him and that they still had meaning in his life of computers and video games. But I was also happy that he had complete faith in me that I could recreate his favorite childhood memory. I'm looking forward to the joy and the challenge of tackling this project in crochet....I want to get it just right, it will be a labour of love.

Back to the Bento box.....if you find her work as amazing as I do check out her blog
(she also made Where the Wild Things Are). They are delightful works of edible art!

Tuesday, April 14, 2009

Finished: Wall-e in crochet


Eve and Wall-e in crochet


He is only 2 1/2 inches high.
I adapted
this great free pattern from sunshineravioli.

My changes:
I put poster board into his main body so that he would be more rigid.
I made the wheels larger and put them under his body.
I added black embroidery to his hands.
I made a base for the eyes using polymer clay then crocheted a outer layer of yarn.
His neck is make of wire covered with yarn so that I could change the position of his eyes.

Here is a work in progress of him...you can see a bit of foam board sticking out of his base.

Wall-e wip

Monday, April 13, 2009

Blocking a knitted sampler pillow

Today I thought I would tackle blocking for the first time.

In knitting class we were given 2 different techniques from 2 different instructors.
One involved blocking each individual piece with steam and then sewing up the seams. It also involved inserting some cool wires to keep the edges straight but they weren't cheap.

The second method seemed easier so I went with it.
I sewed all my pillow pieces into 2 panels: a back and front. Then I wet the panels in a sink and gently squeezed out the water by placing them between a dry towel. Next I spread them out on a dry towel and pinned them to their proper size (16 " for my pillow) and let them dry.
(Not a great photo .... the sun is hiding).


I'm happy with the results except for one unexpected side effect.
I used Ultra Berroco which is 50% alpaca /50% wool.
When the yarn was wet it stunk! Not sure if it is the alpaca or something they added to it but it was not pleasant.
I sure hope it disappears when it is dry.

Edit: On Ravelry I asked why I was having this problem and I got some useful and funny stories. Apparently this is perfectly normal. Most people suggested that I add
a touch of Eucalan to the water before wetting the wool.


Wednesday, April 8, 2009

A pledge.......I will teach someone how to......

I signed up for something interesting the other day.
It was a pledge, started by
KnitLuck, where she promised to teach someone how to knit if 10 other people would do the same. ....12 people have signed up so far.
(Crocheters have now also been included).


I think this is a wonderful idea, I have often heard people remark that they learned these crafts from a neighbour, grandmother or friend.
What a wonderful way to
keep these crafts alive but more importantly its a way to build lasting memories.
If this appeals to you, you can still add your name here to the pledge...the deadline is not until May 1 st.

KnitLuck is also posting links to each participant's blog and who they intend to teach.
I'm hoping to teach my sister how to crochet.
She is about to become a grandmother for the first time so it would be the perfect time for her to learn and a lovely way for us to spend time together.

Tuesday, April 7, 2009

My daily crusty bread


"The smell of good bread baking, like the sound of lightly flowing water, is indescribable in it's evocation of innocence and delight...."
M.F.K. Fischer, The Art of Eating


This is the type of recipe that you almost want to keep to yourself. You know the one where everyone loves it and it looks like it is a lot of work when, in reality, it is ridiculously easy.
The only reason I am even sharing it here is because no one in my family knows about this blog. Right now it is known as my bread and I'd like to keep it that way.

In fact it is so easy to make we have been eating it for supper almost every night since I first made it.The one pictured
is an artisan style loaf that brings back memories of the type of bread we ate in Italy together with cheese, olives, wine and figs. But you can easily change it by adding whatever mix of whole grains and seeds you'd like...healthy food at its tastiest.

There is next to no work involved in making it... 5 minutes mixing it up the night before, a couple of minutes to punch it down the next day, then another minute to pop it in the pan. That's it,

The reason so little work produces such a beautiful bread is twofold.
....First is time....
Between these small moments of work you give the bread, or more specifically the yeast, the time it needs to do it's own thing...eat and grow . It does quite nicely without our interference.
.....The second reason this works is how you bake it. Professional bakers have the luxury of having expensive ovens that deliver the right amount of moisture to the bread which results in a perfect crust. You can try adding moisture by spraying the bread, putting pans of water in the oven, all sorts of tricks. But trust me, they don't work as well as this simple method, you put it into a preheated heavy covered pot for half the cooking time.

Okay, enough jabbering..here is the link.

Use the covered pot method and choose a smaller loaf.
Trust me, you will get a perfect loaf even if you've never made bread before.

Sunday, March 29, 2009

WIP...... Wall-e in crochet

I've been working on this for far too long.
I'll add the details when I post the finished little guy.

Wall-e wip


Not perfect but close enough.
Hopefully I'll post the finished Wall-e soon, then I can finally start something new.
Link to finished Wall-e

Tuesday, March 24, 2009

Marie Claire Idees spring 2009


The spring issue is in my hot little hands and, as always, gives me a chance to practice my French.
I particularly love their take on owls.
This lovely was created using a paper mache technique, so simple yet so sweet.


Look at these...a small owl made of felt hitches a ride on the back of a scarf;
smooth pebbles get a lick of paint to form a parliament of owls and
a small loaf of owl bread is cooling off on a kitchen table waiting for the kids to wake up.

Tuesday, March 10, 2009

A free crochet owl pattern

First Marcie Nishioka posted a pattern on how to knit a ball on Ravelry.
Then some knitters turned those balls into a parliament of owls in sweaters... first by doctorhectic and then by others such as dubb, KimberlyPye, Anniepurls and arc.
All of them are adorable!

So I decided to make one in crochet and share the pattern with you.
My pattern is untested so please let me know if you find mistakes.

Mine is 2 1/2 inches in diameter; I used a 5 mm hook and worsted weight yarn.
I worked mine in a spiral and used a marker to mark the beginning of each round, moving it up with each round.
(In Row 2 you will start in the first stitch of Row 1 which joins the ring).

Body
Row 1: In magic ring crochet sc 6. (6st)
Row 2: *2sc in each st* repeat until end. (12 st)
Row 3: *2sc in first st, sc in next st*
repeat until end (18 st)
Row 4: *2sc in first st, sc in next 2 st* repeat until end (24 st)
Row 5:
*2sc in first st, sc in next 3 st* repeat until end (30 st)
Rows 6-7: sc in each stitch (30 st)
Row 8: *sc decrease, sc in next 3 st*
repeat until end (24 st)
Row 9:
*sc decrease, sc in next 2 st* repeat until end(18 st)
Row 10:
*sc decrease, sc in next st* repeat until end(12 st)
Stuff firmly
Row 11:
*sc decrease* repeat until end (6 st)
Finish off and sew seam closed with tail yarn.
Add buttons for eyes and embroidery or sew on felt for nose.

Sweater pattern
Repeat body rows 1-4 (after row 4 you will have 24 st)
Rows 5-11: sc even (24 st)
Row 12:
*sc decrease, sc in next 2 st* repeat until end (18 st)
Finish off and weave in thread.

Please note that all content and images are mine and are protected by
copyright.

Thursday, March 5, 2009

One Year Anniversary

To celebrate my first year of blogging I made cakes.

No, not the sweet sticky kind...... I made yarn cakes.
I bought myself a wool winder and have been winding all my bits and bobs of yarn.


I first saw cakes of yarn at my knitting class and loved how they looked. But they are also practical.
They are stackable (how cool is that!) and because of the centre pull there is no fighting with tangles.

Plus I no longer have to chase my yarn around while I crochet or knit.
Unlike my dog, they sit obediently in one spot.


Thursday, February 26, 2009

From Garter stitch to lace

I'm very happy to see how far I have come in my knitting class in 7 classes.
On the right is my homework for my first class...a strip of garter stitch (straight knitting).
On the left is actually 2 classes...the lower part is a snowflake that I made from a chart, and the upper part is 2 pattern repeats of a lace pattern.

Wednesday, February 25, 2009

Two packages in the mail

It's been almost like Christmas this past week...post lady Pat popped 2 packages in my mailbox.


The first one was from a sweet girl named Arina who lives in The Netherlands.
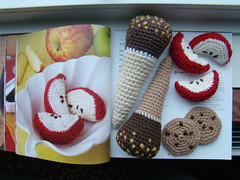
She sent me a wonderful package of knitting patterns by Alan Dart....joy!
It's very difficult to find them here so I was really excited and grateful to receive them.
I first saw her knitted and crocheted items on her flikr page.
She and her sister, Baujke, also sell knitted, crocheted, and sewn items at Baukje en Dirkje Creaties
Thank you so much Arina!

The second package was from another sweet girl, Salihan, who lives in Australia.
Her package contained a beautifully soft Malabrigo merino scarf that she had hand knitted.
Salihan recently celebrated the relaunching of her wonderful blog
(now called Salihan crafts)
by having a draw and, as luck would have it, I won the scarf :0)
I have admired her knitted work for some time so it's wonderful to actually wear something that she has made.
Thank you so much Salihan, it will be so wonderful to wear such a warm and pretty scarf!
And don't forget to check out her blog and she is also on Ravelry.

Sunday, February 22, 2009

Amigurumi Butters (crochet)


Butters
I adapted a Stan pattern by lafeecrochette on etsy into Butters by changing the hair, eyes and colour of his clothes.
This is for my 20 year old and is about 3 inches tall.

Link to amigurumi Cartman
Link to amigurumi KennyLink to South Park afghan

Wednesday, February 18, 2009

Yarn Graffiti, Crochet Style

I've seen so many pictures of yarn covered poles and statues, stop signs, and car antennas but I have never seen one in person.
So today I decided to crochet a little graffiti starting with this ugly chain link fence that surrounds a nearby school.


It adds a
little colour to an unexpected place on a dreary winter's day. But it is also not so elaborate that it will break my heart if it is taken down.
I hope it lasts for a while.


I had to be a bit sneaky to put it up without anyone seeing me, but since it was cold and windy it went quite smoothly.

I'm thinking of covering a pole next.

Edit: Well it lasted until today, May 27th, that's over 3 months...not bad!

Saturday, February 14, 2009

My heart is yours!!!


My heart is yours!!!
Originally uploaded by hine
This totally cracks me up (this won the Valentine's Day contest over at Craft Magazine.)
I think the icing on the cake is the guard around it's neck, you don't want any stitches being ripped out!
Congratulations hine!

Happy Valentines Day Everyone!

Saturday, February 7, 2009

Fingerless gloves in crochet jacquard and a little basketweave

I'm working on 2 things.
On the left is my my knitting homework from last week,
which is the basketweave stitch. It's cute isn't it and quite easy.
On the right is the beginning of the most beautiful fingerless gloves that I've ever seen.

I fell in love with these gloves by Danielle Kassner
the minute I laid eyes on them

I had never seen crochet done like this before.
So I bought the pattern and some wool
(unfortunately I had no 'scraps of sock or fingering weight yarn').
It took me a few tries but I finally found a hook that would give me gauge (I crochet loosely so I had to find a 2 mm hook).


These are done in crochet
jacquard and backwards crochet, both totally new techniques for me.
(great free tutorials here).
I decided to use greens and blues as the main colours with bits of grey, white and red.

I'm only 8 rows in, but I hope to gather speed as I get better at the technique.
I'm ridiculously excited about them.
I just hope that I finish them before spring.

Tuesday, January 27, 2009

Art on a Paris sidewalk


By C215
Originally uploaded by vitostreet
This beautiful drawing was made on a pavement of a street in Paris.
I love how the chipped pavement looks like swirling autumn leaves and
the detail, colour, and expression of the cat is just wonderful!

Sunday, January 25, 2009

A little mushroom house

I used this great free pattern from Crochet Me and made it into a little house.
It's 5 inches high and made with scrap worsted weight yarn and a size 5 mm hook.
The top part has a lid and is hollow so I can store buttons, or paperclips.

I didn't want it to tip over when filled so I put a magnet inside the trunk and I'll probably place it onto a metal base. I'm thinking of making a few of them, all lined up on a shelf or window sill to help keep my work space tidy.
The cute owl that is beside it is needle felted and was made by coltpixy

Friday, January 23, 2009

Free crochet leaf pattern with pics

I'm not sure if this will be of interest to anyone but I needed some leaves for a project and this is what I came up with.

I used a small amount of worsted weight and a 3.75 hook
It measures 3 inches long.
You can make your leaves larger or smaller
by changing the yarn weight and the hook size.
I also left a long tail when I began my chains
so that I could connect other leaves.

Directions:
Ch 14
Row1: Work one sc in second chain from hook, sc in next 3 chs, dc in next 5 chs, hdc in next 2 chs, sc in next chain, 2 sc in last ch.

Row2: You will now need work on the bottom loops(see picture below)
Work sc in next 2 loops, hdc in next 2 lps, dc in next 5 lps, sc in next 4 lps, sl st to join in 1st sc (from Row 1)
Fasten off and weave in end.


I also drew a symbol chart and included an explanation of the symbols.

Symbol Explanation


Please note that as usual all content and images are mine 
and are protected by copyright.

Crochet Max from the Wild Things

 Who doesn't love Max!! I'm really happy with this cute little guy Pattern by Carla Mitrani  You can find her on Ravelry  Max Patter...