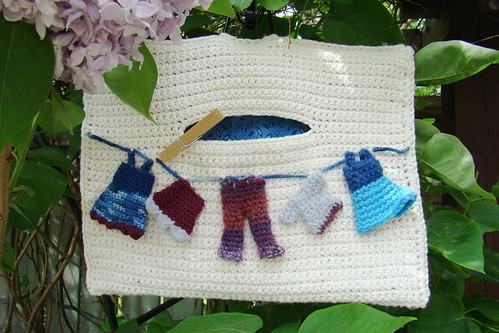
I use my outdoor clothesline a lot and when my store bought peg bag finally fell apart I decided to crochet one.
It seemed natural to make little clothes for the front of it so I ended up designing some that are very close to what I wore when I was around 20 years old.

Today I'm posting the pattern for the bag.
You can find the free patterns for the clothes here.
Bag:It seemed natural to make little clothes for the front of it so I ended up designing some that are very close to what I wore when I was around 20 years old.

Today I'm posting the pattern for the bag.
You can find the free patterns for the clothes here.
Yarn: Bernat cottontots, colour sweet cream.
Hook:4.5mm
Finished dimensions 12x20 (w x h)
Beginner level
You will make a large rectangle( with an opening) which you will later fold in half.
The width of the rectangle is the width of your hanger plus 1 inch and
the length is 2 times the height you want your bag to be.
I made my rectangle 12 inches by 20 inches.
I placed my opening 16 inches from the bottom of my rectangle.
For my yarn and hook size:
Make 53 chains. Rows 1 & up: sc each row to end, ch 1 turn. (52 st)
Continue crocheting rows until you have made a length of 16 in.
You will then make a row that has an opening for the pegs as follows:
Sc in the next 15 st, make 22 chains, skip the next 22 st, sc in the last 15 st.(52 st)
(Basically you want to divide your width into 3 parts ...2 sides and an opening.
First decide how wide you want your opening ..this will be the # of chains that you make and # of skipped stitches. The remaining # of stitches will be your two sides.)
Lining: You don't have to line it but I wanted to stop my bag from getting stretched out too much. I took the easy path and simply cut a piece of fabric that was 11 inches wide by 16 inches tall. Pin along outer edges and sew all edges using the same colour of thread as the bag itself.
Now is the time to sew on any embellishments.
I simply used thread to sew mine on.
Next fold the bag lengthwise and either sc or slip stitch the side seams closed.
Next insert the hanger through the top opening and crochet that closed leaving the hook part sticking out.
Add your clothes pegs and you're good to go!
Please note that all content and images are mine and are protected by
copyright.I love to share my patterns but, as usual, please do not claim them as your own or publish my patterns on your site without my permission ....you are more than welcome to link to it. Do not sell any items made from this pattern. Also I ask that you credit me as the designer when posting your pics of any items you make.


12 comments:
Wow! So sweet!
I love your wee clothes on the peg bag. Adorable! Thanks for sharing the patterns.
This is so cute!
I really need to make one :)
Thanks for sharing. I'm going to make this!
Thanks guys, I'm glad you like them!
nice bag....thanks 4 the pattern.
Hi Sukugirl,
Thank you so much for providing the pattern for this. I have made a similar one with a few changes. You can see it here. I have linked back to your blog.
Thanks once again and keep up the good work of sharing.
Yellow star, I hope you enjoy making it...suki
Hi Gayathri,
I like the colour you used for your bag...I'm sure your friend will like!
I also like how you changed it by putting straps on it. It will probably swing around less so it would be easier to get to the pegs.
cheers suki
I made a pair of pants from the wee clothes pattern you have on your blog. They fit my bjd Pukifee doll to a t. Thanks so much for the pattern. Buying clothes is so expensive and it's hard to find crochet patterns from them and my knitting isn't great. It was so easy to do too.
Hi Bluenosegirl,
that's so cool that they fit your doll.
When I made them I had no idea that they would ever be able used in that way. Thanks for sharing that with me!
cheers suki
Post a Comment