Wednesday, June 17, 2009

Would you pay $182.14 US for this USED softcover book?


That is what someone
on ebay is asking.
On Amazon, someone has it listed at $156
and a while back I saw it for $220....all used.
I'm sorry but that's just nuts.

I have only seen one project made from this book
a cute, retro style, crochet owl cosy.
So I was always left with the impression
that this book must be full of amazing little projects.
Well I discovered this is NOT the case.

A couple of days ago I found a copy
at my local bookstore for $4.99.
You can imagine how thrilled I was....
until I opened the book.
There are only a couple of cute tea cosies
the owl and the one on the cover.
The rest are either boring or just plain ugly.
Honestly, I think $4.99 is about the
right price for this book.


Don't get me wrong, I LOVE tea cosies, so I it kills me
to diss one of the few cosy books out there.
But there are 2 books that I would recommend,
both have gotten good feedback and are priced right.
This first is called Wild Tea Cosies
and the second, which I have,
is simply called Tea Cosies.

Also, here are a couple of sites that
you might enjoy.
Check out Handmadelife
for her version of the owl cosy from the Killer book
and Wild For Tea Cosies
which is a wonderful site penned by
Loani Prior,
the author of Wild Tea Cosies .
Here you will find pictures of some beautiful cosies ,
some from her book and some from other sources.
And last but not least Ravelry has a great
group called Cuppa Tea.
Check out their completed cosies and also their
great forum!

Monday, June 15, 2009

How to crochet Eve from Wall-e

I wanted to see if I could come up with
a pattern for Eve.
She is actually quite simple to make;
she basically has an egg-shaped body and
a squished sphere for a head.
This is what I came up with,
she is 4 1/2 inches small.

Crochet Wall-e


Pattern

-White worsted weight yarn and 4.mm hook
-blue embroidery floss plus needle
-black felt
-polyfil for stuffing
I worked her in spirals and marked the beginning of each row with a marker.

Head:
Work 6 sc into magic ring. (6)
Round 1: 2 sc in each stitch (12)
Round 2: *2 sc in first st, sc in next st* repeat (18)
Round 3: *
2 sc in first st, sc in next 2*repeat (24)
Round 4: *2 sc in first st, sc in next 3* repeat (30)
Round 5:
*2 sc in first st, sc in next 4* repeat (36)
Round 6: sc in each stitch (36)
Round 7: * sc dec in first, sc in next 4* repeat (30)
Round 8:
* sc dec in first, sc in next 3* repeat (24)
Round 9: * sc dec in first, sc in next 2* repeat (18)
Round 10:
* sc dec in first, sc in next * repeat (12)
Fasten off leaving a long tail.
Stuff firmly with polyfil

Body:
Work 6 sc into magic ring. (6)
Round 1: 2 sc in each stitch (12)
Round 2: *2 sc in first st, sc in next st* repeat (18)
Round 3: *
2 sc in first st, sc in next 2*repeat (24)
Round 4: *2 sc in first st, sc in next 3* repeat (30)
Rounds 5-10: sc in each stitch (30)
Round 11: * sc dec in first, sc in next 3* repeat (24)
Round 12: * sc dec in first, sc in next 2* repeat (18)
Round 13: sc in each stitch (18)
Stuff firmly with polyfil
Round 14:
* sc dec in first, sc in next * repeat (12)
Round 15: sc in each stitch (12)
Round 16: sc dec in each stitch (6)
Fasten off and weave in ends.

Arms: Make 2
Again you are working in rounds.
-Try not to work your stitches too tightly especially at the beginning
since you are only working into a small ring of stitches.
It will get easier as you go.
-Make sure you use a marker to mark your first stitch (moving it each row).
- Check your stitch count after EACH row (shown in brackets).

Work 3 sc into magic ring. (3 st)
Round 1: 2 sc in first st, sc in next, 2 sc in last st (5 st)
Round 2: sc in first, * 2 sc in next, sc in next * repeat from*to* twice (7 st)
Round 3: 2 sc in first, sc in next 5, 2 sc in last. (9 st)
Rounds 4-7: sc in each (9 st)
Round 8: sc dec in first stitch, sc in next 2, sc dec in next, sc in last 3 (7 st)
Fasten off and leave a long tail. Stuff lightly to form an arm shape.

Assembly:
Using picture as a guide cut out a faceplate in the black felt.
If your felt is thin then cut two faceplates and sew them together using a blanket stitch.
Embroider eyes using blue floss: I used a backstitch to outline and then satin stitch to fill in.

Using black thread
sew on faceplate to head.
Sew head onto body then arms onto body.
If you find her arms stick out from her body too much
put a couple of stitches a bit lower from her shoulder into her body.
I attached fishing line to hang her because I didn't want to change her shape
just to make her stand.


Please note that all content and images are mine and are protected by
copyright.

I love to share my patterns but, as usual, please do not claim them as your own or publish my patterns in any way ....you are more than welcome to link to it. Do not sell any items made from this pattern. Also I ask that you credit me as the designer when posting your pics of any items you make.

Wednesday, June 10, 2009

Fulfilling a plege

Yesterday my sister came over for a visit
and I took the opportunity to teach her how to crochet
as part of a pledge that I made
here.
It was a short visit so I figured it would be best to keep
it simple and show her just the basics.
She caught on quickly, so I promised her another
lesson when we get together next
(she lives in another city).


It was a lovely way to spend the afternoon
and I'll update with pictures when I
get them from her.
Thanks Knitluck
for starting this great pledge!!

Friday, June 5, 2009

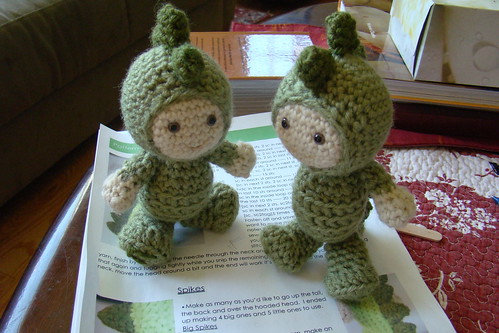
a boy with a dinosaur suit (times 2)


I have the cutest neighbours.
Finn is 2 years old and his brother Leif is 4 years old

They often stick their heads out their window and have a little chat with me.

Today for example I learned from his brother that 2 year old Finn was in trouble because he had started saying the F word and the X word (I don't know the X one but since they are Finnish maybe it is something that they picked up from their dad.)
I stopped myself from laughing... it was hard to picture the F word coming out of that sweet child's mouth.

They both love dinosaurs and Halloween and I've been wanting to crochet them something for a while. I finally saw this wonderful pattern by Owlish and knew that it would be perfect.

Two brothers in dinosaur suits

I made 2 'brothers', one slightly smaller, both with their initials on the bottom of their feet so that they don't mix them up.
I gave it to them today and was rewarded with big smiles.
I probably should have waited until Finn wasn't being punished but that is the advantage of being a neighbour and not a mother to them.

Thursday, June 4, 2009

7 random things

I have been tagged by coltpixy
to write 7 random things about myself.

1. I eavesdrop on people all the time, mostly at out-of-the-way coffee shops. I think I would make a good spy.

2. I never have less than 30 library books checked out and 40 on hold. The ones I have out now are a mix of yarn, mythology and art.
I love being cheap!

3. I like people who are slightly out of step with the mainstream.
Trust me, there are a lot of eccentrics in a city of 2 1/2 million.

4. I'd much rather have something used than new. I love that it has a history to it.
(Again this works into my cheapness factor).

5. I have started writing children stories just for the pure pleasure of it.
I do it just for me and I love the freedom and joy that comes out of this process.


6. I think I have entered my second childhood, how else can I explain this trend toward crocheting amigurumi toys.

7. I'm always trying to learn how to read lips.
It's actually very difficult to do, I thought it would be easier since I took linguistics in university but it's not. Sometimes I'll try to figure it out from watching tv and once I got so involved that I tried to read the Muppets' lips.......duh.


Tag you're it...but only if you want to play!

Howie Woo
salihan crafts
Mette
Nena


Crochet Max from the Wild Things

 Who doesn't love Max!! I'm really happy with this cute little guy Pattern by Carla Mitrani  You can find her on Ravelry  Max Patter...