A few weeks back I was
lucky enough to meet a fellow
Ravelry member who goes by
the username
Miahandcrafter.
The more we spoke the more
I realized
how kind and talented she
is.
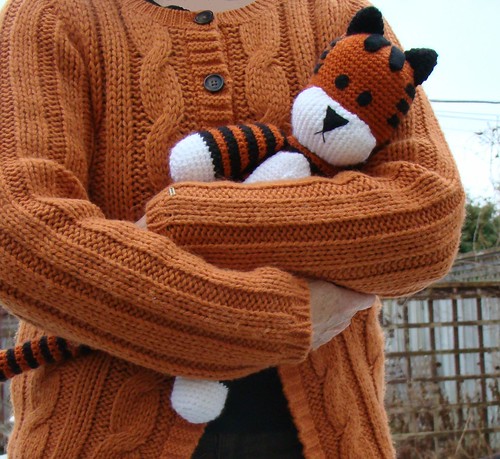
Out of this meeting came a variation of my Hobbes pattern
which was co-created by myself and Mia
which we'd like to share with you.

So you now you have 2 patterns to choose from.
Our new version posted below
and my Original Hobbes pattern here
But before we get to our pattern
Out of this meeting came a variation of my Hobbes pattern
which was co-created by myself and Mia
which we'd like to share with you.

So you now you have 2 patterns to choose from.
Our new version posted below
and my Original Hobbes pattern here
But before we get to our pattern
here is a bit about Mia:
When did you first start crocheting?
''I think I started
crocheting in January of 2010.
I went to my grandma’s
house to have some crochet lessons with her.
So, she helped me out with
my first project,
which was an awesome Kero pattern
created by Ournew from
Craftster.''
Why did you
choose to make amigurumi?
''Well, I’ve always been a
lover of plushes.
Being more realistic, I’m
an addicted to plushies, lol.
My room is full of them in
any size you can imagine.
So, when I discovered that
I could do my own plushies with crochet, I went crazy!
That’s when
I decided to learn crochet and make every plush I desire.''
Who
inspired and supported you?
''The person who inspired me to crochet is my Grandma,
because she does lovely works, which I’ve always been
a fan.
It was also her, my boyfriend and my parents
who gave me support to start learning crochet."
Why did
you decide to start your blog?
''I decided to create a blog in order to share my amigurumi patterns
and
help other crocheters with some tutorials.
The urge to create my blog
came from my admiration
of all crocheters who share their patterns for
free,
especially WolfDreamer.
I think there’s nothing better than
to find
the desired pattern for free!''
~~~~~~~~~~~~~~~~~~~~~~~~~~~~~~~~~~~~~~~~
Gengar, R2D2, Charizard, Majin Buu, Princess Lumpy Space
and my personal favourite Jake the Dog!!!!


You can also find her
So without further delay here is our pattern.Hobbes Crochet Pattern
by sukigirl and miahandcrafter
Materials:
- Black, Orange, Red and White yarn;
- Black Felt;
- Fiberfill;
- Tapestry Needle;
- Contact Glue or Fabric Glue.
Notes:
1. This pattern uses 100% acrylic yarn. Thickness is 3/6 Nm (Don’t know “Nm”? Click here).
(Yarn used was Le Mont by Circulo.....you can substitute a DK weight)
2. Hobbes measures 21 inches (53cm) from ears to feet.
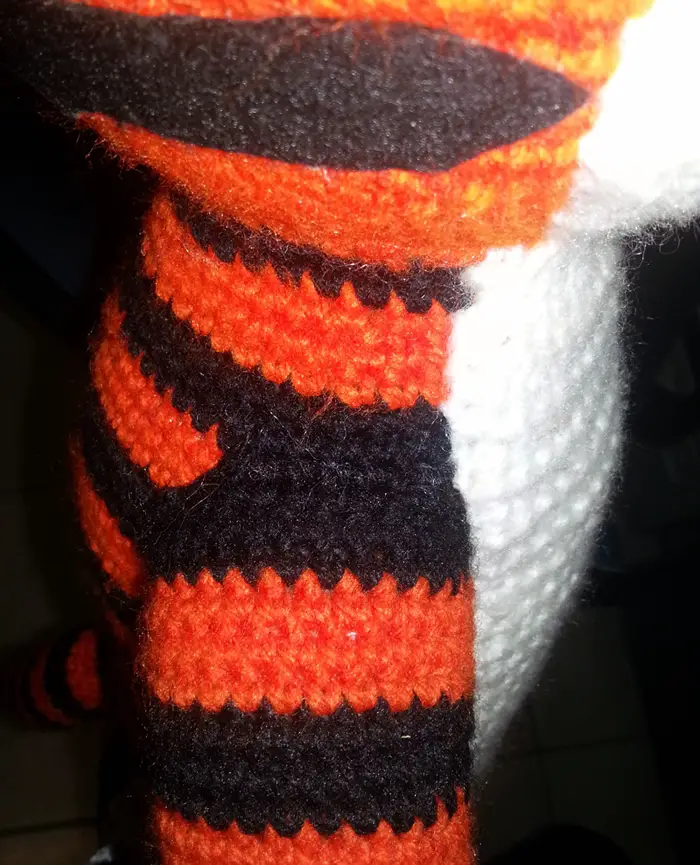
3. In this pattern it is necessary to join the rounds, because of Haroldo’s stripes (black tiger stripes)! If you don’t do that, the stripes will be irregular and won’t look good, so, I recommend you to join the rounds! (If you don’t know how to join rounds, watch this video)
4. For sewing the pieces together you will use the tapestry needle.
5. His eyes, nose, mouth and head stripes will be made of felt.
Any doubts feel free to leave a comment on our blogs. You may also e-mail us.
Pattern:
- Body
Start using the orange yarn.
Round 1: 6 Sc in MR. (6)
Round 2: 2 Sc in each Sc (12)
Round 3: sc, 2 Sc in next Sc (18)
Now, before starting the round 4, change to the black yarn.
Round 4: sc 2, 2 sc in next sc (24)
Round 5: sc 3, 2 sc in next sc (30)
Round 6: sc 4, 2 sc in next sc (36)
Now, before starting the round 7, change to the orange yarn.
Round 7: sc 5, 2 sc in next sc (42)
Round 8: sc 6, 2 sc in next sc (48)
Round 9: sc 7, 2 sc in next sc (54)
Now, before starting the round 10, change to the black yarn.
Round 10: sc 8, 2 sc in next sc (60)
Round 11-12: sc in each sc (60)
Now, before starting the round 13, change to the orange yarn.
Round 13-15: Sc in each Sc (60)
Now, before starting the round 16, change to the black yarn.
Round 16-18: Sc in each Sc (60)
Now, before starting the round 19, change to the orange yarn.
Round 19-21: Sc in each Sc (60)
Now, before starting the round 22, change to the black yarn.
Round 22-24: Sc in each Sc (60)
Now, before starting the round 25, change to the orange yarn.
Round 25-27: Sc in each Sc (60)
Now, before starting the round 28, change to the black yarn.
Round 28-30: Sc in each Sc (60)
Now, before starting the round 31, change to the orange yarn.
Round 31-33: Sc in each Sc (60)
Now, before starting the round 34, change to the black yarn.
Round 34-36: Sc in each Sc (60)
Now, before starting the round 37, change to the orange yarn.
Round 37-39: Sc in each Sc (60)
Now, before starting the round 40, change to the black yarn.
Round 40-42: Sc in each Sc (60)
Now, before starting the round 43, change to the orange yarn.
Round 43: Sc 8, dec (54)
Round 44-45: sc in each sc (54)
Now, before starting the round 46, change to the black yarn.
Round 46: Sc 7, dec (48)
Round 47-48: sc in each sc (48)
Now, before starting the round 49, change to the orange yarn.
Round 49: Sc 6, dec (42)
Round 50: sc in each sc (42)
Round 51: sc 5, dec (36)
Now, before starting the round 52, change to the black yarn.
Round 52: sc in each sc (36)
Round 53: sc 4, dec (30)
Finish off.
- Head
Make it using just the orange yarn. (Then, we will do the head stripes with black felt)
Round 1: 6 Sc in MR. (6)
Round 2: 2 Sc in each Sc (12)
Round 3: sc, 2 Sc in next Sc (18)
Round 4: sc 2, 2 sc in next sc (24)
Round 5: sc 3, 2 sc in next sc (30)
Round 6: sc 4, 2 sc in next sc (36)
Round 7: sc 5, 2 sc in next sc (42)
Round 8: sc 6, 2 sc in next sc (48)
Round 9: sc 7, 2 sc in next sc (54)
Round 10-12: sc in each sc (54)
Round 13: sc 8, 2 sc in next sc (60)
Round 14-31: sc on each sc (60)
Round 32: sc 8, dec (54)
Round 33: sc 7, dec (48)
Round 34: sc 6, dec (42)
Round 35: sc 5, dec (36)
Round 36: sc 4, dec (30)
Finish off and leave a long tail to sew the head to the body.
- Muzzle
Make it using white yarn.
Row 1: ch 17, then sc 16 from the second ch from hook (16)
Row 2: inc, sc 14, inc (18)
Row 3:inc, sc 16, inc (20)
Row 4: inc, sc 18, inc (22)
Row 5: inc, sc 20, inc (24)
Row 6: sc in each sc (24)
Row 7: sc in each sc (24)
Row 8: sc in each sc (24)
Row 9: dec, sc 20, dec (22)
Row 10: dec, sc 18, dec (20)
Row 11: dec, sc 16, dec (18)
Row 12: dec, sc 14, dec (16)
Now, crochet sc’s around the muzzle to give it an edge and then finish off, leaving a long tail to sew it to the head.
- Ears
Make it using black yarn.
Round 1: 6 sc into MR (6 sts)
Round 2: 2 sc in each sc (12)
Round 3: Sc in each Sc (12)
Round 4: sc, 2 sc in next sc (18)
Round 5: sc in each sc (18)
Round 6: sc 2, 2 sc in next sc (24)
Round 7-9: sc in each sc (24)
Finish off and leave a long tail to sew it to the head.
- Legs
Start using the White yarn.
Round 1: 6 Sc in MR (6)
Round 2: 2 Sc in each Sc (12)
Round 3: Sc, 2 Sc in next (18)
Round 4: Sc 2, 2 Sc in next (24)
Round 5: Sc 3, 2 Sc in next (30)
Round 6-9: Sc in each Sc (30)
Now, before starting the round 10, change to the black yarn.
Round 10-12: Sc in each Sc (30)
Now, before starting the round 13, change to the orange yarn.
Round 13-15: Sc in each Sc (30)
Now, before starting the round 16, change to the black yarn.
Round 16-18: Sc in each Sc (30)
Now, before starting the round 19, change to the orange yarn.
Round 19-21: Sc in each Sc (30)
Now, before starting the round 22, change to the black yarn.
Round 22-24: Sc in each Sc (30)
Now, before starting the round 25, change to the orange yarn.
Round 25-27: Sc in each Sc (30)
- Arms
Start using White yarn.
Round 1: 6 Sc in MR (6)
Round 2: 2 Sc in each Sc (12)
Round 3: Sc, 2 Sc in next (18)
Round 4: Sc 2, 2 Sc in next (24)
Round 5: Sc 11, inc (26)
Round 6-9: sc in each sc (26)
Now, before starting the round 10, change to the black yarn.
Round 10-12: sc in each sc (26)
Now, before starting the round 13, change to the orange yarn.
Round 13-15: sc in each sc (26)
Now, before starting the round 16, change to the black yarn.
Round 16-18: sc in each sc (26)
Now, before starting start the round 19, change to the orange yarn.
Round 19-21: sc in each sc (26)
Now, before starting the round 22, change to the black yarn.
Round 22-24: sc in each sc (26)
Now, before starting the round 25, change to the orange yarn.
Round 25-27: sc in each sc (26)
Now, we will work in rows, before we start we should change our yarn to the black one.
Row 28: 13 sc (13)
Row 29: 11 sc (11)
Row 30: 9 sc (9)
Finish off and leave a long tail to sew the arm to the body.
- Underbelly
Make it using white yarn.
Chain 9
Row 1: sc 8 (8)
Row 2: inc , sc 6, inc (10)
Row 3: inc, sc 8, inc (12)
Row 4: inc, sc 10, inc (14)
Row 5: inc, sc 12, inc (16)
Row 6: inc, sc 14, inc (18)
Row 7-35: sc in each sc (18)
Row 36: dec, sc 14, dec (16)
Row 37-47: sc in each sc (16)
Now, crochet sc’s around the underbelly to give it an edge and then finish off, leaving a long tail to sew it to the body.
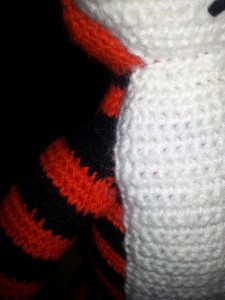
- Tail
Start the tail using black yarn.
Round 1: 6 Sc in MR (6)
Round 2: 2 Sc in each Sc (12)
Round 3-7: sc in each sc (12)
Now, before starting the round 8, change to the orange yarn.
Round 8-10: sc in each sc (12)
Now, before starting the round 11, change to the black yarn.
Round 11-13: sc in each sc (12)
Now, before starting the round 14, change to the orange yarn.
Round 14-16: sc in each sc (12)
Now, before starting the round 17, change to the black yarn.
Round 17-19: sc in each sc (12)
Now, before starting the round 20, change to the orange yarn.
Round 20-22: sc in each sc (12)
Now, before starting the round 23, change to the black yarn.
Round 23-25: sc in each sc (12)
Now, before starting the round 26, change to the orange yarn.
Round 26-28: sc in each sc (12)
Now, before starting the round 29, change to the black yarn.
Round 29-31: sc in each sc (12)
Now, before starting the round 31, change to the orange yarn.
Round 31-33: sc in each sc (12)
Now, before starting the round 34, change to the black yarn.
Round 34-36: sc in each sc (12)
Now, before starting the round 37, change to the orange yarn.
Round 37-39: sc in each sc (12)
Now, before starting the round 40, change to the black yarn.
Round 40-42: sc in each sc (12)
- Scarf
Make it using red yarn.
Row 1: ch 9, then sc 8 from the second ch from hook (8)
Row 2-125: sc in each sc (8)
Finish off. At the end my scarf was measuring about 69cm.
Now, let’s do the scarf details. It is simple, you just have to cut some pieces of yarn and then tie these pieces on the two tips of the scarf.
Assembly:
First, stuff the head, body, arms, legs and tail. Then you should sew the muzzle and ears to the head (if you want, you can put some fiber between the muzzle and the head). Then, you should sew the underbelly to the body. After this, sew the head, legs and tail to the body.
Finally, sew his arms to his body. To do this, you will place his arms with the Rows up. They should be placed up in order to make his arms be closest to his body. If you do not do that, the arms will make 90 degrees with the body. Take a look in the photo bellow:
The black rows are placed up.
The black rows are placed up.
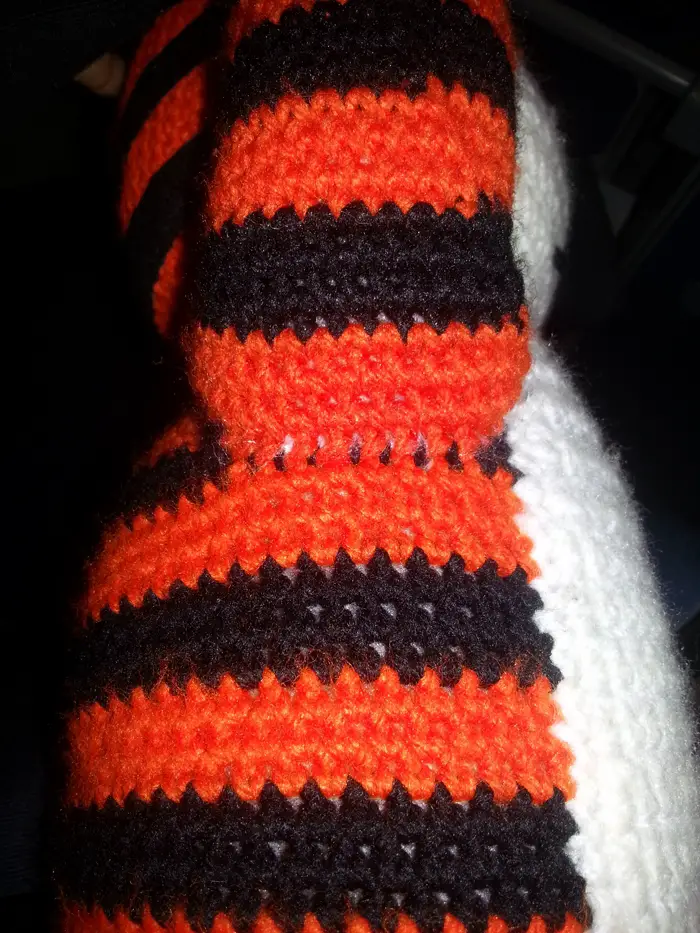
As you can see, in the bottom are placed the last Rounds.
Finally, make the eyes, nose and mouth froom black felt. Cut the pieces and glue them to the face. (Use the pictures as reference)
That’s it! Now you may hug your Hobbes plush a lot!!
We did not create this character, Hobbes is copyright of Bill Watterson!!
This Pattern was created by Ann Stiver-Balla and Ana Amélia Mendes Galvão. Please do not claim our pattern as yours; If you use this pattern, give us the credits; If you wish to share this pattern, you may create a link to our blogs, but please do not post it on your site; You may not sell this pattern; As well, respect Bill Watterson copyright and do not sell any items made from this pattern.


86 comments:
This is fabulous! One question though (and forgive me if it sounds stupid...) how many balls/skeins of yarn did you use for each colour? You don't really specify...
Slowplum,
I'm using Plymouth Yarn "Dreambaby" (DK acrylic) with a size F crochet hook. Not quite finished yet, but it looks like 1 50gram ball of each color will do. May be close on the orange, tho. Would suggest having extra of it to be sure.
Hope this info is helpful.
Hi Sukigirl,
My oldest daughter loves Hobbes and wants me to make him but I'm not sure if I can. For example, how many beginning chains do I start with? Do the 6 sc go into the chains then get joined with a slp st? I'm a USA crocheter so perhaps the terms are different?
Please help! Thank you in advance.
Slowplum, Mia, my co-creator, didn't keep track of her yarn when she made him up. Sorry, I'm guilty of doing the same thing...could you buy extra and then return any extra yarn?
Regina, MR means magic ring...you crochet into the ring then pull it tight so that you don't get a hole. If you haven't used this before then check out the tutorials online. You tube has some good videos explaining the technique.
Hey sukigirl, I managed to find a bulk bag of orange yarn on sale and I always have a ton of black and white so I'm set! I figure whatever I have left over I can use to make Jayne hats so it's ok. I just wondered if you knew how much was used. I'll see if I can keep track and let you know for sure!
I love this post! I'm completely new to crocheting, and have been sticking to simple things like scarves, it is time for a new challenge. I am trying to learn new abbreviations to crocheting, so I am quite confused with a lot of the terminology that applies to this project. Can you recommend a link, or some sort of glossary page that can help me out?
Much appreciated! Thanks!
Thanks Slowplum, that would be so helpful!
I know when I came up with my original version I really only made it for my son so I didn't keep track of how much yarn I used.
cheers suki
Anon,
Here is a link that gives the abbreviations.
http://crochet.about.com/od/crochetabbreviations/a/Crochet_Abbreviations.htm
I noticed they didn't include MR which is magic ring.
For that go to youtube and do a search. There are tons of videos so if you don't like one then just check another one out.
Hope that helps...cheers suki
I used worsted yarn, which made Hobbes' noggin rather long but it is cute anyway! I think if I did the project again using worsted I'd shorten the amount of rows used to make the head as well as the body, but otherwise it worked out ok. Got away with using only 1 50g ball of black and white, and 1-1/8 balls of orange (could probably get away with only 1 ball if I shorten the noggin as mentioned above). I think if I were going to use DK I'd go with 2 balls orange, 2 balls black (to be safe) and 1 ball white. Of course scrap yarn for the scarf - barely touched a ball! Hope this helps...
Thanks for that feedback Slowplum...I know that when I make a project I always check the comments since they are always so helpful...cheers suki
Hi sukigril:
My 24th year old son just showed me this website yesterday and wanted to see if I can make him a hobbes. His name is Calvin and we named him because of "Calvin and the Hobbes". How funny that I read your blog and found that you have a 23 years old boy as well. Thanks so much for sharing your pattern and I will let you know if it is a success!! Merry Xmas!!
Love the pattern, but I have a couple questions about using it = legal-wise. Someone sent me a link to your blog and a link to an instructable site which had instructions for a plushie Hobbs.
I make Amineko amigurumi cats and I kind of combined the two pattern concepts into my version of a Hobbs-type tiger. I made the first one as a gift for a new grandma - but now that it has been seen by others, I am getting requests for more. Can I sell what I make - without copyright issues? It is neither your pattern nor the Amineko pattern - but my adaptation of both. I am not selling the pattern - just the tiger I made. Would appreciate any advice on this. I don't call him Hobbs.
I frequently use "free" patterns as a jumping off point. I don't write my own patterns, but I use free patterns and adapt/mutate, or generally make them my way. Am I being kosher to sell the finished product as mine?
Hi Costalgrannie,
I'm glad you asked this question because there are a lot of people who think that copyright does not apply to patterns that are free or adapted...but that is not true. It can be complicated but here is the simple version.
You can't adapt/mutate other people's patterns and sell the finished objects unless you get permission to do so by the original creators. Even if you change them up you are still deriving it from their work. You can make something for your own personal use but you can't profit from it...it isn't yours to do so.
My pattern is derived from Mr. Watterson's Hobbes so I can't sell my pattern or any finished product from it. Anyone who uses my pattern can't sell my pattern or any finished products made from it.
Anyone who adapts/mutates my pattern can't sell the pattern or any finished products from it because it was derived from my pattern which was derived from Mr. Watterson's creation.
This version you see here is a collaboration between my co-creator Mia and myself.
You'll notice that we still state in the pattern that it was adapted from Mr. Watterson's creation.
I almost always adapt other people's patterns when I make them. I made a bunny that really didn't end up looking like the original one because I changed it so much. But I made my changes from that pattern...I didn't sit down and come up with the ideas that went into it. I used it as a guideline even if I changed it up to give it my own unique take on it. So I really had no rights to it other than being proud of the changes and work that went into it.
Even if I gave it another name it would not be mine to sell.
I hope this helps you.
take care...suki
I stumbled across this pattern from you last week. I was so excited I ran out and got the supplies to stitch Hobbes up. Just finished him today and I'm so proud with how awesome he turned out! I'm still a newbie to crocheting and this has taught me so many new skills. Thanks for sharing the pattern!!
I am currently working on Hobbes. Youtube has been very helpful with some of the terms I was stuck on. I do have a question when it comes to the arms. Work in rows, I started to make a chain & realized to still work the rows into the round, but do I do for example 11 ch, then another & turn to go on to the next row or just 11 & then the next row using the ch next to hook?
Hi Diane,
I'm so glad that you were happy with how your Hobbes turned out!
I'm impressed that, as a newbie, you didn't have a lot of problems with him. I think you might be new to crochet but you are no longer a newbie :-)
cheers suki
Hi Anon,
I am assuming that you are asking about Rows 28 to 30 in the arms?
At the end of row 27 you change to black.
In Rows 28 to 30 you will now be making a little flap that will help you join the arms to the body.
You do NOT break the yarn and make a separate piece.
You do NOT make a chain.
You just continue working on that arm but you will not be working rounds anymore...you will be working 3 short rows instead.
At the end of each row you will turn your work and then work the next row.
It sounds complicated but it's not.
I hope this helps you...suki
I love that you have this pattern available online. However, I have a question regarding the underbelly: The first row says to single crochet 8, but is that after chaining 8/9 or are you supposed to single crochet 8 ONTO the body? I'm sorry if this seems a stupid inquiry.
Hi Renee,
That's not a silly question at all.
You do first chain 9...sorry for omitting that.
Thanks for catching that...I'll add that right away.
cheers suki
Hi, my 9 year old daughter is all about Calvin & Hobbes. She's thrilled that I'm gonna try my hand at Hobbes. I have a question about the muzzle. I see it's worked in rows; do I chain 1, turn, then work a sc in that same st? Chain 1 counts as a st? Thanks for the pattern, it's great! Needless to say, as soon as she gets home from school she's on me about it. She's really excited, but I've got a ways to go yet, hahaha. Anna
Hi Anon,
I think you are asking about the first row of the muzzle? If so..you chain 17, then turn your work and make 16 single crochets starting from the second chain. You will end up at the end of the row with 16 stitches.
If I misunderstood you I'm sorry and please let me know if this helps.
cheers suki
How do you sew the ears on? Could you post a picture of the back of his head? I'm not sure how to go about it without making them look funny. Any chance you could post some more detail pics of the whole thing?
Hi .
Can you make a smaller version of Hobbes ? Im not sure if I managed to finish your pattern . Maybe you could create something like keychain of Hobbes ?
Hi Anon, that sounds like a nice idea but unfortunately I'm so busy these days. Maybe someday, when my to-do list gets a lot shorter.
cheers suki
Hey! I'm making this guy (and he's totally awesome) but i have a question. Could you post pictures of the back of his head so to better know what kind of felt arrangements you'd recommend? I can't really see it from the ones you've posted thus far.
yes, back of head pictures would be helpful
Sorry guys...I don't have a Hobbes to take more pics of....suki
I am in the process of making a Hobbes for my husband for Christmas. I also was having a hard time visualizing what the head stripes should look like from the back. I found this link to be helpful:
http://www.superpunch.net/2012/01/how-to-make-stuffed-hobbes.html
The link is to a pattern for a fleece/felt Hobbes, but I did find the back of head pics to be super helpful. Hopefully, this helps some of you as well! Happy hooking! :)
Hello and thanks for sharing your hobbes pattern.
I am making him from this pattern, but like the head of the original hobbes pattern. Will the head from the original pattern fit on the body from this new pattern? Or will it be to big/small?
Thank you
Stine Lise
Thanks anonymous for posting the fleece head, I'm sure that will be helpful :-)
Stine Lise,
I think that the head of the original pattern would be too small for the body of the newer pattern.
You probably could adapt it to fit although it would take a fair amount of work.
Hi Sukigirl. I am really enjoying making your Hobbes. It is for a friend of mine that just had a little boy and named him Calvin, I just had to make her a Hobbes to give him. I am stuck on the arms, round 5. I'm not sure I am reading it right. Is It sc 11 times, then increase? And do that twice? Note quite sure. When I am done I will send you a picture.
Hi Lori,
Yes that's exactly right....so you will increase in the 12th stitch and the last stitch which will result in 26 stitches.
I'm looking forward to a picture!
Hi Suki!
I just finished a Hobbes amigurumi using this pattern, and wanted to thank you and Mia for creating and sharing it with us all! Here is a photo of the plucky tiger himself:
http://imgur.com/Ad8qiSY
I made Hobbes for an old college friend (University of Delaware, 2001) who I hope will love him very much. Almost 20 years ago, he taught me how to drive stick shift on his beloved 1997 Chevy Camaro (aptly named "Hobbes"). We now live over 300 miles apart, but remain good friends. Thank goodness for Facebook!
Thanks again for making this tutorial available. I have been crocheting for maybe 15 years but have never made an amigurumi before. I couldn't have done it without your help!
-Kim
Hi Kim,
Your Hobbes is adorable...I really loved going to your link and seeing his cute, face jump up on my screen :-)
Mia and I were really happy to share this pattern with everyone.
cheers suki
Hi sukigirl, I noticed that in this version you are glueing on the felt pieces and in the other version they are sewn on. Which results did you like best? Which method do you recommend?
Suki,
I have a question about the muzzle. Is this part of the pattern done in an oval? That is how I am stitching it, but I am stuck.
I have gotten through row 3, but then when I go to start on row 4, I don't have enough stitches to complete row 4.
Thanks for your help. I am enjoying making this Hobbes plush so far. It's for my sister's birthday. She loved reading the Calvin/Hobbes comics as a kid.
Hi Rachel,
Yes the muzzle is an oval shape.
You should have enough stitches to complete row 4.
When you completed row 3 you should have 20 stitches. So for row 4 you are making an increase in the first stitch, then single crocheting in the next 18 stitches, then increasing again in the last stitch.
You would only have a problem if you didn't have the proper number of stitches (20) at the end of row 3.
Is it possible you've made a mistake before this row?
Hope that helps.....suki
Hi Lori,
Mia, who co-created this pattern, used glue when attaching the felt and she is comfortable with that method.
I've only used glue when attaching felt once..that was on my fox slippers. I was tired and the slippers were for me.
But for every other project I've sewn them on.
I think I'm more old school, I like the look and feel of it when it's been sewn on although it's a lot more work.
Not sure if that helps you at all but it's a good question...suki
Hi sukigirl!
I really loved this pattern! My boyfriend likes Hobbes so much, so I'm doing one for him ^^
I'm thinking of starting a blog where I can share some cute patterns translated to Portuguese, because here in my country (I'm from Brazil) there's just a few blogs that offers amigurumi's patterns for free, and some people who want to make them (like my mother) just can't understand the English patterns. So... May I ask your permission to translate this pattern and post it on my blog as my first post? Of course, I'll credit you and Mia (I'm almost sure she is Brazilian too... Does she have a blog in Portuguese?), and I'll warn people to not sell this amigurumi... I'll include a link to the original pattern on my post too, and I'll show Mia and you my post when it's done... Just let me know if that's ok for me to do that =)
Thanks for your comment.
I'm sorry but I have to say no to your request.
It's really important for me to keep all of my original designs and translations only on my blog.
What I can offer is to post the translation here (with credit and a link to your blog).
That way be both get our due credit.
Let me know and thanks again for your nice comment....suki
If there are no stripes on the head do you still join the rounds? Thanks for the pattern! - Calvin
I personally like to make the head in rounds as the stitches tend to line up horizontally instead of spiraling. But it is up to you since, as you say, there are no stripes :-)
Gotcha, thanks! I'll do the same. Also helps keep my mind trained in joining rounds, as it's easy for me to forget. I've got to say, this Hobbes is going to be big. I just used whatever yarn I was able to find and it must be thicker than yours - this Hobbes will practically be lifesize (to the original Hobbes). I love that. I'm making it for a friend's newborn who they named Calvin. And I personally named myself after Calvin and Hobbes (long story). So this is near & dear to me. Thanks again for the patten and for making it free in recognition of Watterson! - Calvin
This version does result in a bigger Hobbes than my original one that I made for my son. If you ever want to make a slightly smaller version you can find that pattern also on my blog. And if you choose a lighter yarn then you can make him even smaller.
Good luck making your Hobbes.....take care...suki
I posted a photo of my finished Hobbes on Raverly under the name TwinklesGirl. Thank you for posting this pattern. It has been fun and I learned a lot.
He's cute....I'm so glad you enjoyed making him.
I noticed your other projects...lucky you that you have a granddaughter you can crochet for...take care suki
I just finished this and love it! I accidentally used worsted weight yarn but I think it only made him a little wider as I still used the 4 mm hook. Also, I added 4 rows at the top of the legs and then sewed that new top flat before attaching the legs so that he sits on a shelf easier. Oh and I added a recorded sound in his paw that I got at build a bear. My boyfriend is thrilled with his new toy and it was worth all the work. Thanks for sharing!
I just finished making my two-year-old son his very own Hobbes following this pattern. And he absolutely loves him!!! Thank you so much for sharing this pattern!
Hi there!
Thank you so much for sharing this pattern, it's adorable!
I'm trying to make Hobbes to give as a birthday gift and I just have one question:
- by the end of the body and head instructions you say "finish off". You mean «keep the pattern of -1sc and dc» or do you mean «dc till close» or am I supposed to leave that part open and just sew it together (head and body)??
Thank you :)
Hi Tutor Tales...I love all the little adjustments that you made!
I can see why your boyfriend is so thrilled with his Hobbes.
And sorry for taking so long to get back to you...suki
Hi Sarah, I'm so glad you enjoyed making him.
I love it that you make it for your little boy!
Hi SueZiy,
Finish off means the same as fasten off.
That way your work doesn't unravel.
Hi Sukigirl,
I finally finished the knit version of Hobbes thanks to the pattern shared on your blog. My husband got it fir Father's Day. Both he and my daughter are over the moon and love the Hobbes to no end.
I can't find any photo sharing option, else I wold have uploaded a photo too!
Best,
Teeas
Hi! Your Hobbes it's very lovely. I really enjoyed making it
In the Hobbes pattern created by you and Mia, is the underbelly crocheted in rows and then given a finishing edge all the way around? He is adorable. Thank you.
Hi Teeas...so glad to see some of the knitters making Hobbes.
I love that you made it for Father's Day!
Hi Rocio...Thanks for the nice words and glad you're having fun making him!
Hi Anonymous,
Sorry I couldn't answer sooner.
Yes you've got it right about how the belly is made.
Hope I didn't delay you finishing your Hobbes.
Thanks for the hard work you two ladies did. My sister, who is due in March requested a Hobbes plush for her son, whom she is naming Calvin. She has always loved the comic strip and, considering my sister and brother-in-law, we may see Calvin and Hobbes come to life.
I've only done one plushie up to now, but I appear to be getting more requests for them since that one success. I'll have to send you the picture of Hobbes with his Calvin in March.
Thanks Katie...Actually Miahandcrafter takes the credit for coming up with this cute variation of Hobbes.
Looking forward to a picture of Calvin with his Hobbes !!
Is there any way you could make a video crocheting Hobbes? I've been feeling too overwhelmed reading the patterns I learn well watching than reading something. Thank you!
Sorry.... I wish I could post a video but my life is so hectic with other work.
I made Hobbes and would like to know if you have a pattern for his sidekick Calvin thanks in advance
This question is 3 years old, but the directions call for a magic ring, which you can find a tutorial for online. It's my favorite way of working in the round.
I have just started this thank you so much my son in law is a huge fan but I have started working the body and as I make it it looks more like a hat is that the way it is suppose to be
The head might look a little like a hat, just double check that you are doing the number of increases correctly.
Also remember that this version is quite large...about 21 inches high.
My original version is smaller; he is only 16 inches tall.
take care...suki
Do you and/or Miahandcrafter have Instagram accounts? I'm making one of these for my boyfriend right now and when I'm done I wanted to post abpixture and tag you two for credit for the pattern :p
Hi Ali,
I"m not sure if Miahandcrafter is on instagram.
I'd suggest that you message her at her Ravelry account or
her online site. Both links are linked in the post above.
cheers suki
Thanks! I'll send her a message.
Do you have one?
Ali...Sorry I should have mentioned, I only have a private one for family.
Hi Sukigirl
I made one Hobbes for the 2th birthday of my boy.
He knows nothing about Calvin and Hobbes, but I love it!
I would like to send pictures, but dont know how to do this xD
Carla...You first need to post your photo to a site (your blog, or a site like flikr that hosts photos). Then send me a link.
Hi thank you for the adorable pattern and I’m going to make this for my newest child Calvin or Leslie I don’t know gender yet.
Your welcome....enjoy!
suki
This is awesome! What is the equivalent yarn weight in DK please? I am trying to work it out but my brain is fried!
Thanks
Hi ErppleBroop,
Not sure the amount in DK since at the time I didn't expect
to write up a pattern let alone share it.
But any earlier ccomment on this post
by Anonymous which might help you.
She/He said,
"I'm using Plymouth Yarn "Dreambaby" (DK acrylic)
with a size F crochet hook.
Not quite finished yet, but it looks
like 1 50gram ball of each color will do.
May be close on the orange, tho.
Would suggest having extra of it to be sure."
Hi! I have kind of an urgent question. My grandson Calvin asked me to make a Hobbes for his birthday and we searched together and chose your pattern! I'm in the process of making it now. The leg instructions seem incomplete tho. Do we decrease at the end??? Thank you!!!
Sorry to get back to you so late.
The leg instructions are correct...you don't decrease.
When you make the legs you start at the feet with a magic circle which means there is no opening.
When you end making the legs they are open, stuffed then joined to the body.
There is a good picture in my post of my original Hobbes that I made that might help you.
https://sukigirl74.blogspot.com/2011/03/free-hobbes-crochet-pattern.html
In it you can see all his pieces laid out before joining.
Hope that helps...cheers suki
I just finished my Hobbes after following your pattern to the letter. He’s adorable. Thank you so much for sharing your pattern, my little grandson is going to love him!
You're welcome Sherona...
So nice to see another little one being introduced to Hobbes!
cheers suki
I just finished the Hobbes character and I love it. Thank you so much! I don’t know if I can post a pic here, but I used slightly more natural colors and I think it is an interesting change!
Courtneh....that's sounds really interesting...could you post a link. I'd love to see him!
Courtney...sorry I mispelled your name..my fingers were faster than my brain
Wish there was a template for nose and the felt strips on face
Unknown: Sorry that there isn't a template but if you use the images you should have no problem.
Post a Comment