Monday, January 31, 2011

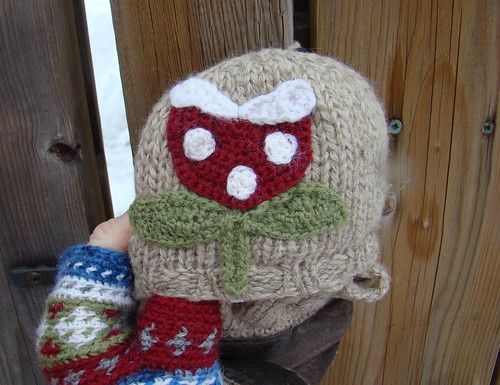
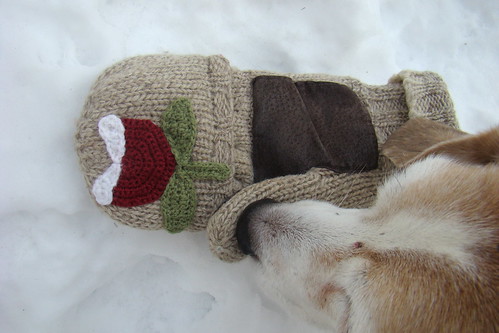
My son's holey gloves got the Mario treatment...crochet style

My son loves his gloves, 
to the point where they now have large holes in them.
When I promised to fix them I was thinking
of simply crocheting a brown rectangle as a patch.
Then I realized that I could be more creative so
this is what I did.

Mario's piranha plant patch for glove


He's had his gloves for years
and he is the type of kid 
who would rather get something fixed
than buy something new.
(Takes after his mum :D)  
He still really likes Mario so
he was really happy with them.

Also in this picture is my beagle
who was sick all day today and part
of yesterday.
I was so happy to see her sniffing around,
hopefully she
will be eating again soon.

'Mario piranha plant' crochet patch

Monday, January 24, 2011

Crocheting backwards without tripping

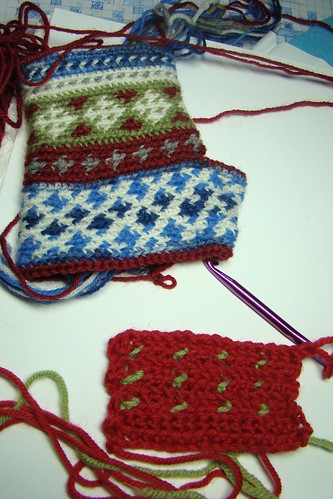
I've made a bit more progress on my gloves.
The colour pattern on the decreases isn't perfect
but since they will be worn
by an imperfect person (me, me, me)
 I'm happy.

continuing to work on my fingerless gloves

I've reached the wrist stage which means
I'll no longer be working in the round,
I'll now be working in rows back and forth.

This means that I will need to use 
another technique that's new to me:
backwards crochet.
The little piece at the bottom is my
practice piece.

Athough they sound similar 
backward crochet is not the same as reverse crochet.
Reverse crochet or crabstitch is worked
with the right side facing you and results
in a twisted stitch.
Backward crochet is a little harder to explain.
Basically this technique 
makes sure that the wrist (worked in rows)
will look like the rest of the glove (worked in rounds).

edit:
I forgot to distinguish which rows were made by which technique.
The glove itself was made with jacquard,
which is a colorwork technique where you
work the different colours and carry the
unused colour along the wrong side (in strands).

I used both jacquard and backwards crochet
in the red sample.
The jacquard is the green and red rows
worked on the right sides.
This is alternated with straight red rows
that are worked in backward crochet
on the wrong sides.

Saturday, January 15, 2011

Tackling jacquard crochet

It's halfway through January and I thought
by now I'd have done a lot of yarn work.
But I do have a good excuse why that didn't happen.
My oldest son has been home for the holidays,
and I drop everything anytime I've got my whole family together.
Things have now returned to normal so
I've picked up my hook again 
and tackled a project that I've had on hold.
since 2009 (2 years!!)

This pattern is made mainly using a technique
called jacquard crochet.
It's basically a technique that works with
strands of colours hooked into the back loop.

When I first tried it I was having a lot of difficulty
with the tension since jacquard crochet
is much tighter and less stretchy than regular crochet.
I'm a tight crocheter as it is so
that didn't help.
I also found all the new techniques
a little overwhelming so I
put it aside until I felt more confident.

 I've decided to start completely over again.
Here is a picture of how far I've gotten.
jacquard crochet fingerless wip

I'd love to say that the stitches are quickly sliding off my hook,
I won't even tell you 
how many hours I've spent on this so far,
but what's different now is that it's a bit 
easier and I now see it as doable.
Some things I'm still struggling with
and I'll post more specifics 
about them in a later post in case 
you want to give this a go yourself.

Tuesday, December 21, 2010

Mirror with vintage doilies

I've been working on redoing my workspace,
painting walls, new storage units, etc 
but with Christmas coming, 
I have had very little time for crafts.
But I did manage to make this quick
project for my wall.
 
decorated mirror

This is made from an inexpensive Ikea
mirror and some vintage doilies I
bought at a garage sale ages ago.


Friday, December 17, 2010

Marie Claire Idees.....inspiration

I'm always thrilled when I can find this magazine
since it is so difficult to find here.
I love these yarn related projects
especially the chandelier.

wreath made with cotton, buttons, cloth, and snaps
This lovely wreath is made with cotton cord, 
buttons, cloth, snaps and other
sewing supplies.

pot sweaters with spring plants

These pots look wonderful decked out in
their knitted covers.

Chairs with kntted covers and motifs

I can only imagine how nice it would
be to sit outside on these chairs 
sipping hot chocolate.
birdhouse covered in knit and edged in crochet
How lucky are the birds that live in this house!

Outside chandelier wrapped in yarn and embellished with crocheted flowers

Last but certainly not least
check out this chandelier.
I may have to adapt this idea to 
my bedroom light.

Thursday, December 16, 2010

Making a few Christmas Ornaments

I've noticed some really cute ornament patterns
this year and I've finally found some time
to make a few.
All of them are from free patterns.

First up is this pretty star that I
made for my friend Star
(also known as Coltpixy).
This one actually took a bit of work
but I'm really happy how it turned out.

Star ornament

The hexagon is a  variation of Priscilla Hewitt's
sunburst granny square.
 I used this great tutorial from Daniela Herbertz
to turn a hexagon into a star.

Aren't the mushrooms cute!
And they are easy to make:
pattern is from Drops 0-723
Drops are posting a free pattern
each day leading up to Xmas.

I've been seeing a lot of cute trees
and the good thing is that you
really don't need a pattern for these
since they are so simple.

Crochet Christmas ornaments

The bauble is from the
very talented Lucy from Attic24.
I've never made anything from her site before
but I now know why everyone loves her patterns.
Here is the link
which includes step-by-step instructions
to guide you (including pictures).

Xmas ornament

This little gem I bought from the
I love how she combines thrifted materials
with zippers....Brilliant!

Tuesday, December 7, 2010

A necklace of flowers

Well.... it started out as a necklace.
But the flowers didn't want to lay flat,
they wanted to twist and turn as real flowers often do.

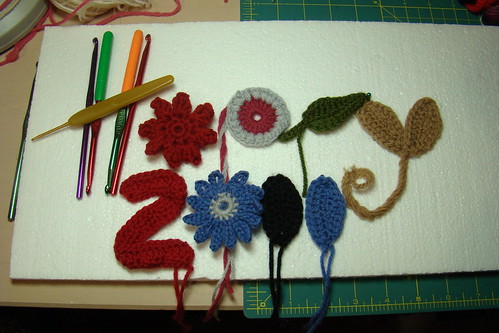
Flower necklace

So I decided to turn it into a mini garland.
That way they can be used
to decorate a doll house,
or be draped over a window,
or circle the neck of a beloved bear.
I'll see what my 2 year old niece decides to do
when she receives it for Xmas.

Details:
I used this great free pattern:
http://www.brigitte.de/wohnen/selbermachen/haekeln-blumenkette-1021662/2.html
although I did use a different flower.
The pattern is in German but
there are pictures to help you.

I used a pretty, soft sock yarn which is probably
why the necklace wanted to twist.
I'd like to make this again but in a worsted weight.
It's a lovely pattern and
written so that the leaves, stems
and the base of the petals
are all worked continuously.
I think it would make a lovely
embellishment.

Monday, December 6, 2010

I'm in love with the monkey

This little guy has been finished for quite a while.
He's been keeping me company while I finished up a few other projects.

Monkey boy

I must say that....
"I've grown accustomed to his face
He almost makes the day begin
I've grown accustomed to the tune he whistles night and noon
His smiles, his frowns, his ups, his downs
Are second nature to me now
Like breathing out and breathing in
I was serenely independent and content before we met
Surely I could always be that way again and yet
I've grown accustomed to his looks, accustomed to his voice
Accustomed to his face"

My Grandma used to play 'My Fair Lady' on 
her record player when I came to visit 
because she knew I loved it so much.
I would stand in front of the mirror,
and twirl and twirl to the music,
(I was around 5 years old).

I adapted this little guy from this great free pattern.
I wanted him to be a lot smaller so I
used a fingering weight yarn and
went down a hook size.
I also changed his body shape.

Monday, November 8, 2010

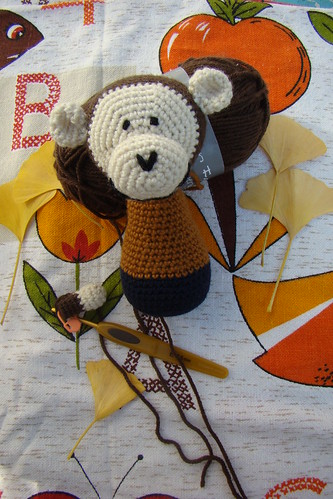
A crochet monkey, a vintage curtain and ginko leaves

Crochet monkey wip
Even though monkey is only partly finished
I thought he would enjoy going outside to
enjoy a beautiful autumn day.
Although monkey and I have spent only
a little time together, he and I have bonded.
Maybe it's because we have similar tastes..
obviously he likes vintage fabrics and
we are both fascinated by ginko trees.

But he is more impatient than I am.
I'm enjoying watching how his shape unfolds
as I make changes here and there.
But he is constantly rushing me to finish,
not concerned whether his legs curve
slightly inward, 
or if his shirt should be striped or plain.
But I forgive his restlessness,
for he is young.

Friday, November 5, 2010

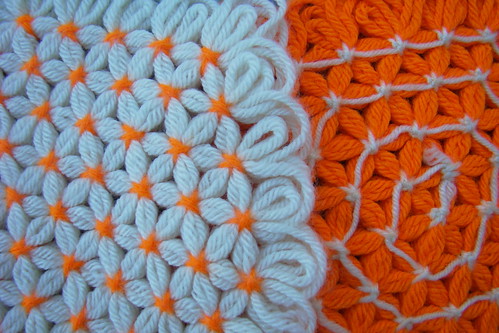
Help!......anyone know how to make these lovely thrift store coasters?

Look at those lovely flowers all held together
with what looks like simple knots.
But how are they done and what is the technique called?
I'd love to know!

thrift coasters

I flipped the orange one over so that you could see how it is tied together.

Sunday, October 31, 2010

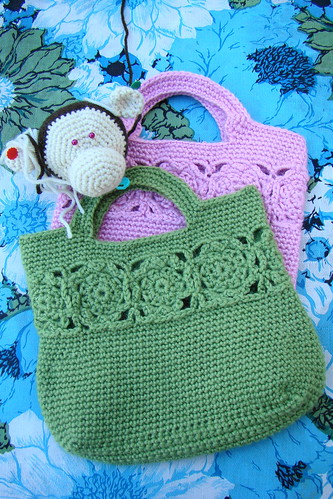
2 small crochet bags and a monkey head

Christmas presents

I've finished the green bag and 
again I have to say how much I love this pattern.
The designer is Yasmin Gamal and
her site is called "The C side of me".
She also has some lovely bag patterns for sale
at really reasonable prices.
The poor little monkey who has no body yet
will be a present for my new nephew
who was born in June.
I had a hard time deciding on what to make him
and then I remembered this monkey pattern.
I'm making him smaller than the original
and I'll probably change the shape of his body a fair bit.

Tuesday, October 12, 2010

Monday, October 11, 2010

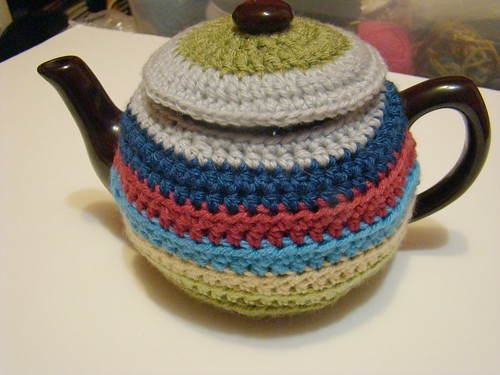
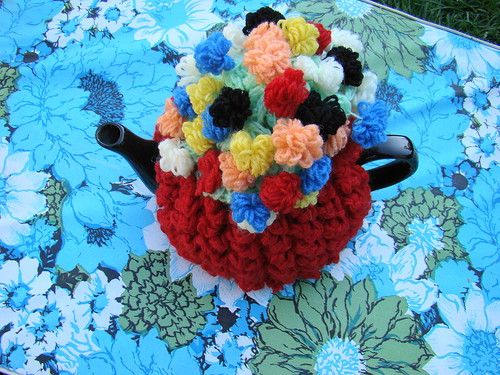
Instructions for making a scrappy teacosy


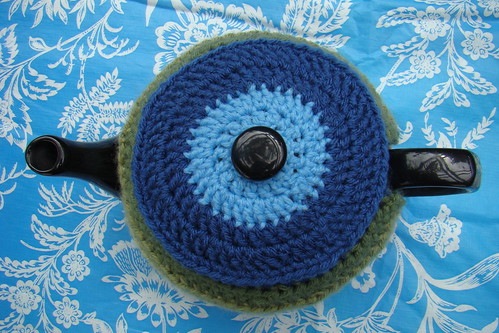
 Day 24: scrap happy teacosy

teacosy top view

 Please note that I am going to totally
revamp this pattern.
 When I first made this teacosy I didn't keep
notes as I really didn't expect that anyone 
would want to make it.
So I made a second cosy and wrote up general instructions.
Now that I look at it 4 years later I realize that it would
work better to start at the top and also
to give line by line detailed instructions.
 
With that said 
if you haven't started it yet you might want to 
wait for the newer version.
I will put the link to the newer version here
and eventually close this post down.
Thanks for understanding.

added....July 2012

Back in February I made the top cosy and was asked 
if I could post the pattern (my apologizes for taking so long).
I made a second one for a larger pot (above)
and diligently wrote down each row and each stitch count.
But because there are so many different shapes 
and sizes of teapots
I thought it would be much more helpful if
I explained the steps involved
instead of giving you a list of numbers.
That way you can make a cosy that fits
your pot instead of mine.
 
 This cosy is made, starting at the bottom.
It's important to keep trying your cosy on
your pot as you work on it 
so that you can make the necessary increases/decreases.
I flipped my teapot upside down on my lap
while I worked to make things easier for me. 

At first, as you work the first few rows
the cosy will not want to stay on the pot.
I found that it helped to temporarily tie the opening 
(under the handle) closed with some yarn.
As you get further into the cosy
it will stay on easier. 
I untied it when I got nearer to the top 
of the spout.

When you are finished the cosy
you will go back and add a buttoned closure
to this opening
so that it hugs the bottom of the pot snuggly
but still allows the cosy to
be easily slipped on and off the pot.
(If you prefer you can add extra chains in section one
so that the closure can be worked at that stage.)


Teacosy:
I worked my cosy in hdc but feel free to
experiment with other stitches.
I worked 2 rows of each colour for the body
and I ended rows with 2 chains for turning.
I do not tell you where to add the increases/decreases,
trust me.... your pot will let you know.

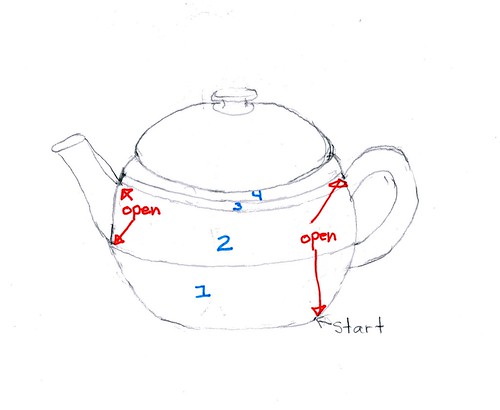
There are 4 sections to the body.
The size of each section will vary with different pots.
drawing for teacosy instructions


The cosy in the picture below is shown upside down so the hole you see at the top is actually the
bottom of the cosy.
This was the second cosy that I made. Note that in this picture I have used the second option
in the instructions where I have added a tab (it's temporarily pinned to form a closed circle.)
Photobucket

And here is a shot showing the opening for the spout.
The cosy is shown right side up.
Notice for this teapot that the opening for the spout starts really low.
Photobucket


Body:
1. Bottom section: This is worked in rows leaving an opening only for the handle.
The instructions don't include the tab under the handle, you can add that when the cosy
is finished. (Or you can add more chains and work the tab).
Make as many loose chains necessary to go from the the edge of the handle around the pot to the other edge of the handle. I found that my yarn stretched so I took that into consideration.
Add 2 more chains for turning.
Work rows of hdc turning at handle.
Your last row should just touch the bottom of the spout.

2. This section is worked leaving both the handle and the spout open.
You will now work 2 sides separately. 
Each side will be worked in rows between the handle and the spout.
Work on one side first...making as many rows necessary to reach the height of 
the top of the spout (on most teapots you will reach the top of the spout before the handle
....but not always).
When you are finished side one break yarn.
(If you finish on your first row of a colour then leave a longer tail (long enough to make a full row of hdc around the pot.
If you finished on your second of a colour then just leave the usual tail length. 
You'll see why in section 3).
Join new yarn to second side and finish that side to same height as first. Break off yarn as usual.

3. This section is worked with an opening only for the handle.
You probably only have to work a couple of rows for this section.
Join new yarn to the first stitch on side one (handle side)...or use dropped yarn.
Work across side one to the spout, then make enough chains to go across the top of the spout, then join to second side ( I made a slip stitch in first st, ch 2 then put my first hdc into sl st)
Continue crocheting across second side turning at handle.
Continue working rows back and forth until you reach the height of the top of the handle.

4.This section is worked in rounds not rows.
Crochet across until you reach the handle top, make enough chains to go across the handle
then continue working in rounds
You should be making quite a few decreases in this part...
to give you an idea; I went from 68 st to 55 st over 5 rows.
I ended just under the ridge of the top opening. You might have to end with sc for the last row
if necessary.

Lid: 
This is basically a circle with a hole in the centre for the knob
I worked the entire lid in dc.
I chained 16 joining with sl st.
Remember that you are making a dome so you really are just making less increases
to the normal pattern of a flat circle.

Finishing up.
If you haven't added a tab for under the handle you should add it now.
I just attached the yarn to the bottom edge and chained enough stitches
so that I could form a small tab below the handle.
I made a space for the button by making a few slip stitches.

I also crocheted a row of slip stitches along the edges of the openings for the spout and handle
just to clean up the edges.
I used the loose tails of the rows instead of using a new piece of yarn so that it wasn't
edged in a single colour.

Please let me know if something confuses you
and I'll try to clarify it.

As usual I ask that you do not reproduce this pattern
or claim it as your own.
Please feel free to link to my page.

Tuesday, September 28, 2010

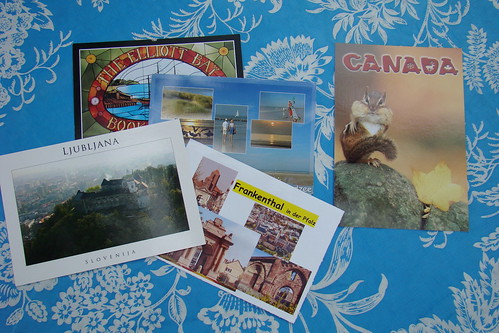
postcards from around the world


I was tired of only seeing bills in my mailbox
so a little while ago I signed up to a cool site called
Postcrossing.
Here's how it works.
You are given the name and address of
someone from around the world and 
you then send them
a postcard.
Once they receive it your name and address is sent
to a totally different person who will send
you a card from their corner of the world.


It's a wonderful surprise to receive them.
I've gotten 4 so far...
from Germany, Slovenia, Belgium and Seattle.
All have written a little about themselves
and their area.


I have sent cards to Kenya, Taiwan, China,
The Netherlands and Wyoming.
The chipmunk card on the right is going 
to a little 3 year old from Germany.
I hope she likes it.


Monday, September 27, 2010

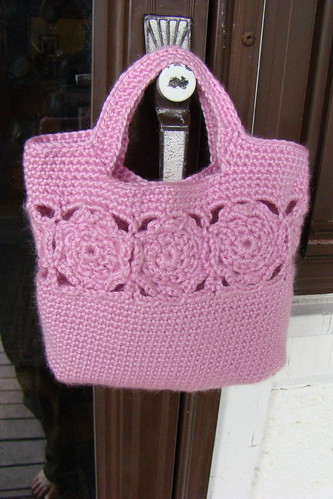
Flower burst bag

little pink purse
First Christmas present done.
(Not the best picture as it is raining here).
I really like how this turned out.
It's the perfect size for a little girl to hold
all her treasures in.
It's 6 inches tall by 7 inches wide.
I made this one with Bernat Satin and used this 
It only took 3/4 of a skein so it cost
 about $3 to make.

I've bought some green organic yarn
to make one for another niece
so I'm curious how different it will look
(other than one is pink and one is green :0)

Sunday, September 12, 2010

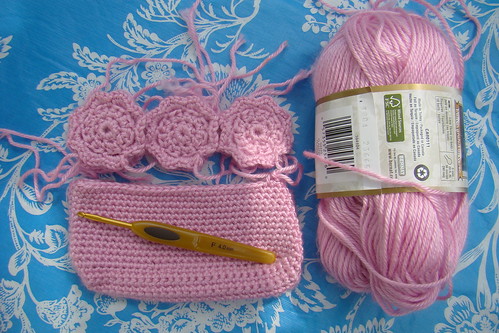
Wip: a little bag for a little girl

I'm starting on my Christmas presents earlier this year.
This way when I change my mind a million and
a half times it won't actually be late December 
by the time I finish it.
a small pink bag...wip

I started off with a very simple but pretty bag for 
my 2 1/2 year old niece.
She is a girly girl and I never know what she
will like. Also her mum really isn't a fan
of handmade things.
So I picked something that doesn't take a long
time to make.

So far I'm loving this bag!
The pattern is for an adult so I shrunk it down by
using a 4.5mm hook and crocheted really tightly 
(hard on the hands).
You make the flowers first, joining them as you go.
Then you make the bottom part and
attach it to the flowers.
Then all you have left is to make the top.
Easy peasy!

Wednesday, September 1, 2010

Tea lover's roundup

Most people know that although I love coffee,
I am a bit obsessed with tea.
So I was excited to learn that Ms. Muffin
over at the wonderful blog Muffins and More
is celebrating the month of September by 
featuring tea related posts...cool eh!

I'm looking forward to pouring myself a cuppa
each morning (sorry coffee) and
seeing what goodies Ms. Muffin discovers.
And it's not too late to submit a tea related
project of your own.
So pop on over
(click on her cute button in the sidebar)

And what would a post be without a picture.
A vintage tea cosy


Tuesday, August 31, 2010

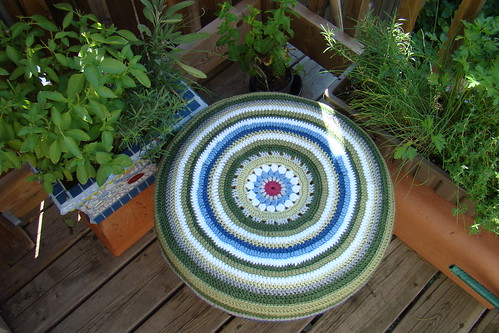
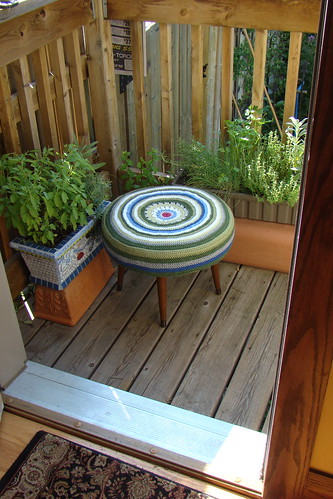
scrappy stool cover

Top of stool cover made in crochet
I've been looking for a small stool that was just
the right size for my husband to put his feet on.
I found one on the curb that was
 a bit torn but was the perfect height.
 I originally planned to sew a cover for it
but I've been looking for ways to
use up my stash yarn so that is when
I decided to crochet this cover.

The centre part is the free pattern
called Sunburst granny by Priscilla Hewitt.
I continued working double crochet in rounds,
adjusting the fit as I went which was sometimes
difficult because my cat pounced on top of it
each time I tested to see if it fit.

I made 2 rows of each colour and when I reached
the edge I continued making double crochet but
with no increases.
I also worked the first row that went over the edge
into the back loops only so it would fold over nicely.

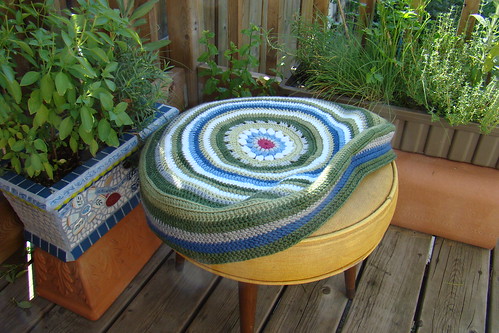
Here is a picture showing a peek at the stool
and also to show how it is removable so
that it can be washed.
crochet stool cover

Monday, August 2, 2010

stool wip


stool wip
Originally uploaded by sukigirl74
Playing around with colours...not sure if the last blue will
work but it will be easy enough to rip out if not.
More details when finished.

Crochet Max from the Wild Things

 Who doesn't love Max!! I'm really happy with this cute little guy Pattern by Carla Mitrani  You can find her on Ravelry  Max Patter...