Friday, November 28, 2008

A crochet rat for Rosie

My niece Rosie lost both her rats
this past year.
I decided to make her one for Christmas
using a great pattern
by planetjune at etsy.


Rosie's rat (side)

He is about the size of her own rats.
Let me just say that it is very difficult
to photograph a black rat.

And you know the expression that
the camera adds 10 pounds.
It happens to rats too.


I never thought that I'd be crocheting a rat.

Wednesday, November 26, 2008

Amigurumi Cartman in Crochet


He's 3 1/2 inches tall and is a
Christmas present for my son.
I bought the pattern from
La Fe Crochette at etsy.

Link to South Park afghan
Link to amigurumi Butters
Link to amigurumi Kenny

Tuesday, November 25, 2008

Standoff

The squirrel wants to get to my
bird feeder which is on the
other side of this kestrel.
Pretty fearless I would say
considering that the hawk is
feeding on a bird that was
at that same feeder.

standoff

Saturday, November 8, 2008

A fast knit


I wanted to make friends with
knitting again so I knit
up a quick scarf for hubby.
The yarn is beautiful and soft.
Jaspe Wool from Romania
The Romanian part sounded right as
hubby has a Romanian grandmother.
Size 15 needles, 15 stitches
in garter stitch.
I started and finished in one evening.

Wednesday, November 5, 2008

The pain of double pointed needles

I know when to quit and
count my losses.
It's not like I didn't give
dpns a fair shot.
My first sock went relatively
well and it was great
having my mum here helping me.

Today I sat myself down to
what I thought would be a nice
quiet morning working
on the second sock.
But I soon came to the realization
that working with those needles
was making me hate knitting.

So I am formally banishing them.


Thursday, October 30, 2008

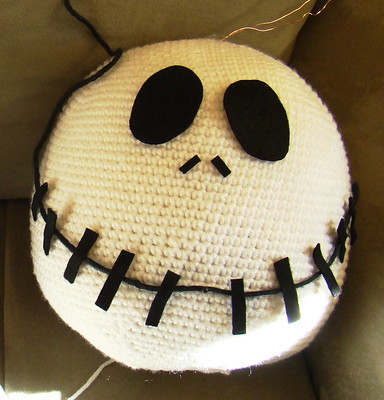
Jack from Nightmare Before Christmas crochet pattern


This is a pattern for Jack's head only.
It is basically just a sphere.
I ended up using felt for the eyes and the
mouth
stitching, although I do give you
a pattern for
crochet eyes.
Jack Skellington
This pattern is untested so
let me know if you
have any problems.
(Also see link to
Zero's pattern by Mishymishy)

I used a size 5 mm hook and worsted weight acrylic.
Gauge: 5 sc = 1 inch
4 rows = 1 inch
the circumference for mine was 27 in.
This head is worked in spirals.
Place a marker at the end of each round
moving it as you work.

Ch 2
Rnd 1:
Work 6 sc into second chain from hook,
join with sl st to form a circle. (6 sc)
-->Rnd 2: Work 2 sc in each sc around. (12 sc)
Rnd 3: Work [sc in next sc, 2 sc in next sc]
repeat around. (18 sc)
Rnd 4:
Work [sc in each of next 2 sc, 2 sc in next sc]
rep around. (24 sc)
Rnd 5: Work [sc in each of next 3 sc, 2sc in next sc]
rep around. (30 sc)
Rnd 6:
Work [sc in each of next 4 sc, 2 sc in next sc]
rep around. (36 sc)
Rnd 7:
Work [sc in each of next 5 sc, 2 sc in next sc]
rep around. (42 sc)
Rnd 8:
Work [sc in each of next 6 sc, 2 sc in next sc]
rep around. (48 sc)
Rnd 9:
Work [sc in each of next 7 sc, 2 sc in next sc]
rep around. (54 sc)

Rnd 10: Work [sc in each of next 8 sc, 2 sc in next sc]
rep around. (60 sc)

Rnd 11: Work [sc in each of next 9 sc, 2 sc in next sc]
rep around. (66 sc)

Rnd 12: Work [sc in each of next 10 sc, 2 sc in next sc]
rep around. (72 sc)
Rnd 13: Work [sc in each of next 11 sc, 2 sc in next sc]
rep around. (78 sc)

Rnd 14: Work [sc in each of next 12 sc, 2 sc in next sc]
rep around. (84 sc)

Rnd 15: Work [sc in each of next 13 sc, 2 sc in next sc]
rep around. (90 sc)
Rnd 16: Work [sc in each of next 14 sc, 2 sc in next sc]
rep around. (96 sc)

Rnd 17: Work [sc in each of next 15 sc, 2 sc in next sc]
rep around. (102 sc)

Rnd 18--39: Work even. ((102 sc)Rnd 40: Work [sc in each of next 15 sc, dec 1 sc over next 2 sc] rep around. (96 sc)
Rnd 41: Work [sc in each of next 14 sc, dec 1 sc over next 2 sc] rep around. (90 sc)
Rnd 42: Work [sc in each of next 13 sc, dec 1 sc over next 2 sc] rep around. (84 sc)
Rnd 43: Work [sc in each of next 12 sc, dec 1 sc over next 2 sc] rep around. (78 sc)
Rnd 44: Work [sc in each of next 11 sc, dec 1 sc over next 2 sc] rep around. (72 sc)Rnd 45: Work [sc in each of next 10 sc, dec 1 sc over next 2 sc] rep around. (66 sc)
Rnd 46: Work [sc in each of next 9 sc, dec 1 sc over next 2 sc]
rep around. (60 sc)

Rnd 47: Work [sc in each of next 8 sc, dec 1 sc over next 2 sc]
rep around. (54 sc)
Rnd 48: Work [sc in each of next 7 sc, dec 1 sc over next 2 sc]
rep around. (48 sc)
Rnd 49: Work [sc in each of next 6 sc, dec 1 sc over next 2 sc]
rep around. (42 sc)
Rnd 50: Work [sc in each of next 5 sc, dec 1 sc over next 2 sc]
rep around. (36 sc)

Rnd 51: Work [sc in each of next 4 sc, dec 1 sc over next 2 sc]
rep around. (30 sc)
Rnd 52: Work [sc in each of next 3 sc, dec 1 sc over next 2 sc]
rep around. (24 sc)
Bind off.
This still should leave a large enough opening to stuff the head.
Eyes: (Make 2).
Row 1: Work 6sc into a magic circle, join, tighten and ch 1 (6 st)
Rw 2: Work 2sc in each sc, join, ch 1 (12 st)
Rw 3: [Work 2sc in each of next 3 sc, 2 dc in each of next 3 sc ]
twice, join (24 st)
If you feel you want a larger eye add a round of sc.
Using photo complete face using your choice of felt
or embroidery.

Tuesday, October 28, 2008

Babette crochet afghan

I've always wanted to make a babette
afghan and decided this would be the
winter to start on it.
But first I looked
through my old craft books
to see some of the 70's versions
of the granny afghan.
This lovely example is from BHG
Crocheting and Knitting 1978

Afghan from BHG Crocheting and Knitting

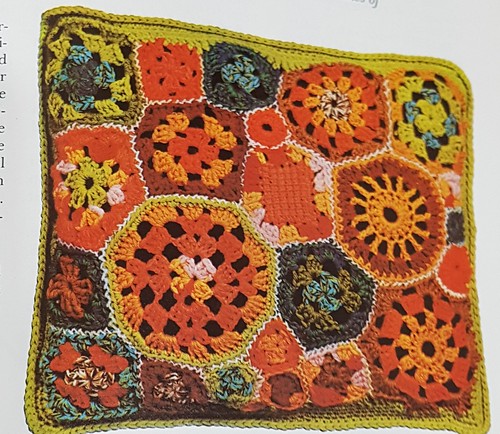
Not quite an afghan but still a
wonderful example of grannys
in this pillow from
McCall's Crochet Treasury 1977

vintage granny pillow
Here is a link to some modern afghans
known as babettes.

It may take me a while to pick
out my colours and also decide
if I will follow the babette pattern or
just do my own thing.
But it is a project which I'm
really looking forward
to starting.

Monday, October 27, 2008

Crochet sheep cozy

Designing crochet

Not much to look at now but this is
my attempt at designing a sheep's
head for a tea cozy.

It is a little wider than my sketch
because it is amigurumi style
so when I add a bit of stuffing
it should be the right width.
Patons SWS charcoal colour
using a 4.5mm hook.

Wednesday, October 22, 2008

Granny Square jacket

Here's today's vintage image:


granny square jacket 1980


It is from a 1980 magazine called
Christmas Ideas
put out by
Better Homes and Gardens Creative Ideas
It is made with 42 granny squares (2 1/2 in)
for the back, 20 for each front,
and 30 for each sleeve,
with simple edgings added for
the colour, cuffs and bottom.

Tuesday, October 21, 2008

Nightmare before Christmas (crochet)

Since my family all love the movie
we thought it would be great for this
year's Halloween theme.

Zero

I think he'll look great hanging in
the dark with a spotlight hitting him.
I made Zero from this great pattern.

Jack is next and should be
quite easy to make.
I'll crochet his head and pop it over my skeleton
and then make his clothes.

Monday, October 20, 2008

Crocheted Christmas Garland


fireplace with crocheted garland

I've made two of these garlands and I am
starting one for myself.

Poor little gingerbread boy!
He needs a candy cane crutch.

Monday, October 13, 2008

How to make Coffee Cozies

Beginner Cup Cozies
by sukigirl74

I made up the pattern for these cozies for a swap
and I wanted to share it.
Coffee cozies


Please note that all content and images are mine and are protected by
copyright.
I love to share my patterns but, as usual, please do not claim them as your own or publish my patterns on your site without my permission ....you are more than welcome to link to it. Do not sell any items made from this pattern. Also I ask that you credit me as the designer when posting your pics of any items you make. 


Please read all notes before starting because
all mugs are not created equal.
I give row counts for my particular mug
but I do tell you in my instructions
how to adjust to fit your own mug
(in red).
I've given you the basics but this
is an easy pattern so have fun with it.

This pattern has now been tested but please let
me know if you find any errors.

Note:
Chain 2's at the beginning of each row count as a stitch.
When making rounds, place a marker in the second chain
so that it will be easy to know where to join with a slip stitch.

Pattern: starting from bottom
Row 1: Crochet enough chains to fit snuggly around
.
the base of the cup, then join with a sl stitch (27 st)
(being careful not to twist chain).
Row 2-3: Ch2, hdc into each st around.
Join with a slip st.(27 st)
(Make as many rows that will take you to just below your handle).

Handle Rows:
(For these rows you will be working back and forth so you will not join.)
Row 4-7: Ch 2, turn work, hdc into each stitch but leave some stitches at the
end unworked (for handle)

(For your mug make enough rows to reach the handle hole.)
Row 8: Ch2, turn, work, hdc into each stitch of previous row, ch 8.
Row 9: Ch2, turn work. Starting in 3rd ch, hdc into each chain and
into each hdc of the previous row.
Row 10-: Ch2, turn. Work hdc into each stitch of previous row.
(For your mug, make as many rows to take you about halfway up the
hole of the handle and end with your last row as a wrong side row. A wrong
side row will mean that you will end NOT at the tab end.)

Buttonhole row:
Row 11: Ch 2, turn.
Hdc into all but last 4 stitches, then ch2 (forms button hole), skip 2, hdc into
last 2 stitches.
Row 12: Ch 2, turn. Work hdc into each stitch
[including the 2 buttonhole chains (from row 11)].
Row 13-: Ch 2, turn. Work hdc into each stitch.
(For your mug, repeat Row 13 until it reaches bottom of your handle top).
Decorative edging
Row 14: Turn, skip first stitch *3 hdc into next stitch, slip stitch in next*
Repeat from * to * until end of row.
(Optional: when you get to the part that lies under the cup handle you can
slip stitch over these stitches. See blue arrow below).

Sew on button using the same yarn and you are done.

Please note that all content and images are mine and are protected by
copyright.

I love to share my patterns but, as usual, please do not claim them as your own or publish my patterns on your site without my permission ....you are more than welcome to link to it. Do not sell any items made from this pattern. Also I ask that you credit me as the designer when posting your pics of any items you make.

Saturday, October 11, 2008

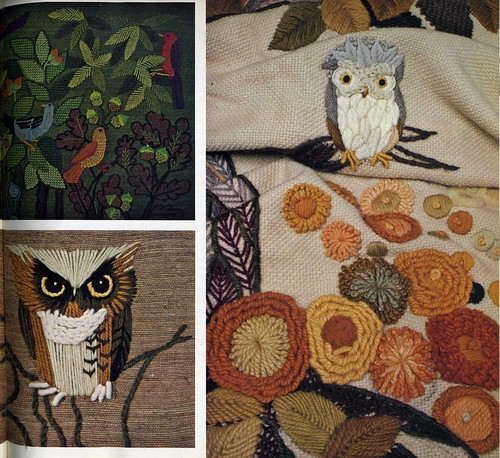
Lovely embroidered owls from vintage book

I'm lucky to be able to find a lot
of vintage craft books from our 

library and from second hand stores,
mostly from the 70's and 80's.

This book I own, 

it's called Needleplay by Erica Wilson
printed in 1975.
Most are made using rug yarn.
I'm in love with the owl
at the bottom left!
But also look at those flowers!


Yarn Owls

Thursday, October 9, 2008

Fabric crochet hook case


I sewed this as part of a swap over at
Creative living
Rach, who I made this for,
makes lovely, lacy things with teeny,
tiny hooks and thread.

The fabric looks very similar to one she
picked as a favourite over at Flickr.
I would love to have included wool felt
in her case but it is impossible to get here.
I really have to order it online someday.

I don't know if you can see it but
there are little squirrels and mushrooms
in the fabric.
So I was thrilled when I found the acorn buttons.
I made the flower out of the same fabric
and added a vintage button to its centre.

Tuesday, October 7, 2008

Owls and colts and tea... Oh my!


I was involved in a swap over 
and received a wonderful package
of handmade goodies from Star.


She knows that I love owls,
am learning to knit,
that I love tea and that
I went to Paris this summer.
How spoiled am I!
Everything is gorgeous..
from my very cool owl potholder,
to my stitch markers, to my tin magnets.


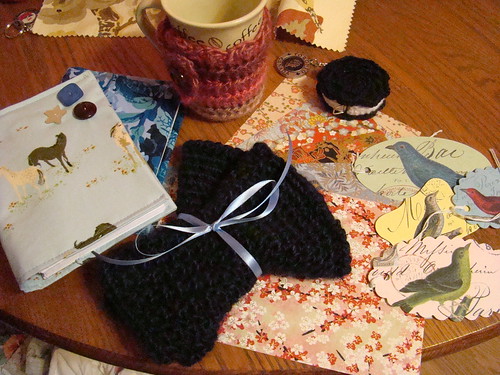
This is what I sent to her.

Star is a great believer of making
lists (she's such an organized woman!)
so I made fabric covers
for 2 small notebooks.
One fabric has flowers and the
other has colts which is part
of her username.
The wristwarmers are to keep
her warm on her daily walks with Reba
on cooler days
and the cozy is for her morning
coffee which, lets face it,
we can't function without.


swap package for Star
 

Thanks for the wonderful swap Star!

Saturday, October 4, 2008

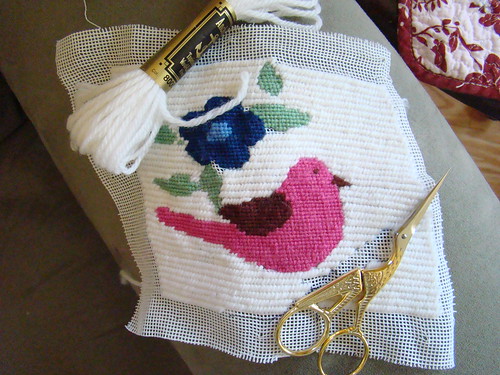
A needlepoint with a few problems

When needlepoint goes bad

This was supposed to be part of a swap project
for a good friend but I decided not
to finish it.
It was to be a pincushion,
with a needlepoint on one side
and fabric for pins on the other side.
It all started really well.....
The design was based on her avatar.

I started stitching the bird and flower first and
I was happy with them. But the background white
caused problems for me,
I used a larger stitch and my tension
turned out to be too tight,
which badly skewed the whole canvas.
When I blocked it, it squared up a bit but
the tension was still too tight.

But I think I learned from my mistakes.
Next time I will use a frame and
keep all of my stitches the same size.
I'll also relax my tension
(maybe with the aid of a glass of wine).
I would really like to have another crack at
this because I do think it could be a
pretty little project if done well.

Thursday, October 2, 2008

Crocheted wristwarmers for cooler weather

I love these wristwarmers!
They just tuck under your sleeves for
extra warmth.
They are perfect for fall weather when it isn't
cold enough for gloves but still a bit chilly.
I crocheted them from this wonderful free
pattern by Melissa Mall from Inner Child Crochet.


Wristwarmers


These are made from a wool soy blend
which is incredibly soft!
I was going to embellish them but
since the recipients don't live nearby,
I wouldn't be able to match any
colours they have in their coat.

Tuesday, September 30, 2008

Learning to crochet using Japanese charts

I've seen so many cool patterns online
in chart form but I really didn't
know how to read them.
So I decided to sit myself down
and figure it out.
I first picked a pattern that had
both a chart and written instructions.
I chose a pattern that I knew
I would normally be able
to crochet fairly easily.
I then made a photocopy of the
pattern so that I could mark
off each row as I made it.

Learning to read symbol charts

I also made sure it had a
chart listing each symbol and
it's corresponding stitch.

symbol chart

I then tried to figure out the first row
by ONLY looking at the chart.
I then went to the written instructions
to see if I got it right.
From then on I pretended that
I only had the chart and worked hard
to figure each row out.
The only time I would look at the
written instr. would be if
I was absolutely stuck.
Once you get the hang of it
it is quite easy.
It's wonderful to be able to SEE
which stitch goes where.

Sunday, September 28, 2008

Crocheted capelet


It rained yesterday so I decided to
finish this capelet.
I'm really happy with it!
I can't quite figure out
what type of top to wear with it.
It is sort of a fall/spring type
of garment...definitely not for summer.

The colour in the pic is wrong.
This link shows it truer.
I will definitely make another
probably in a nicer yarn.
Oh, and it also only took 2 skeins.

Here is a link to the beautifully
written and easy pattern.


Update: I have since frogged this.

The yarn wasn't the nicest.

Wednesday, September 10, 2008

Panforte=happiness


I pity the fool that has never eaten panforte.
Okay, maybe that is a little strong... but just a little.
The lovely city of Siena, Italy might be famous for
the incredible horse race known as the Palio,
but for me it's famous for this amazing dessert!
I'd even take this over Italian gelato which
is saying a lot!

It's hard to describe but it is closest to a fruitcake
(in texture only)..I happen to HATE fruitcake
so I hate even typing that word.
It has honey, almonds, pepper, cocoa
and spices. Mmnnnn!
It comes in a few different flavours
but chocolate and the famous panpepato
(pepper to us) are my favourites.

Each time I am lucky enough to visit Siena
I bring back as much as I possibly can.
Then I savour each slice with a good strong
cup of Italian coffee knowing that
my precious supply is dwindling.

Even the package is beautiful!

Crochet Max from the Wild Things

 Who doesn't love Max!! I'm really happy with this cute little guy Pattern by Carla Mitrani  You can find her on Ravelry  Max Patter...